
3D Affine Transformation
- 3D point를 표현할 때
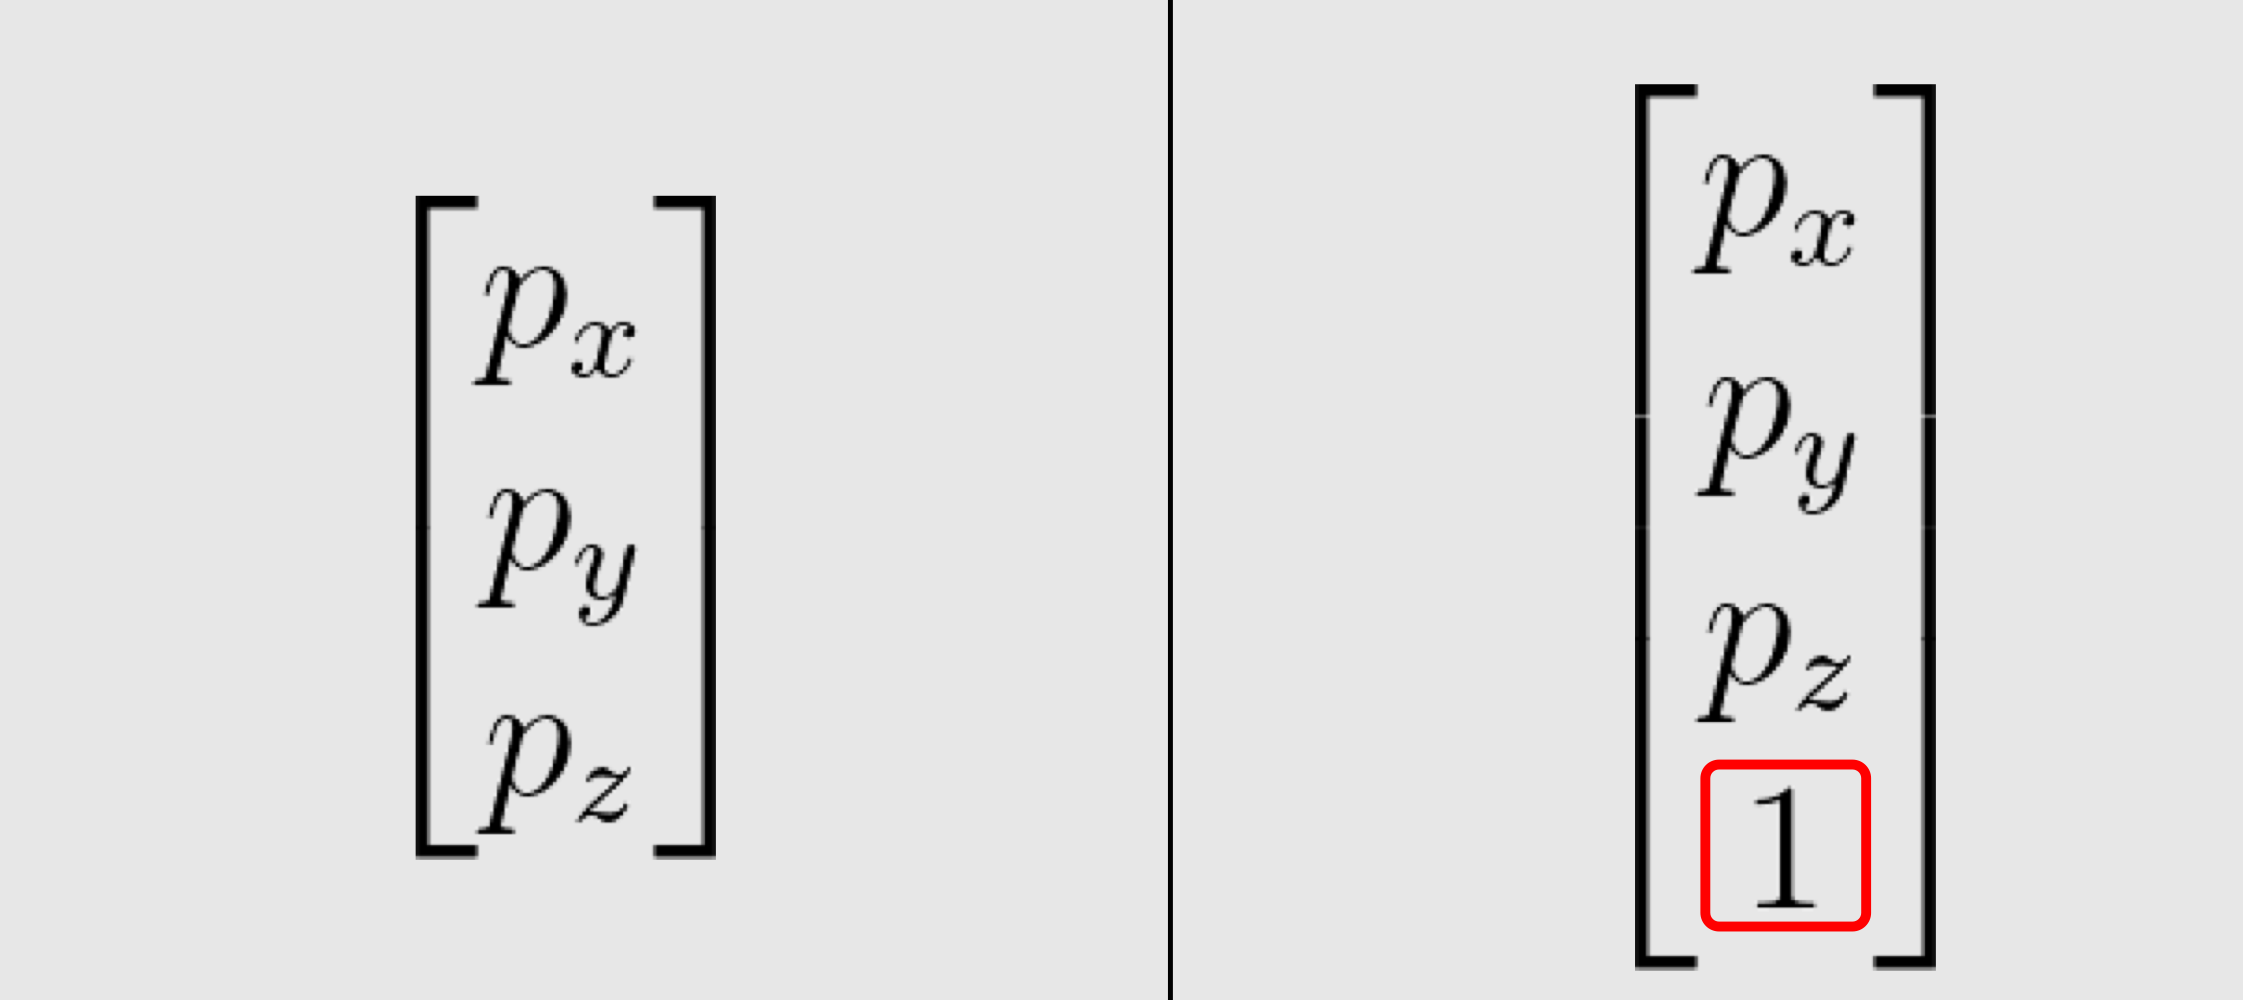
(왼쪽은 Cartesian coordinate system, 오른쪽은 Homogeneous coordinate system)
- Linear Transformation in 3D를 matrix multiplication으로 표현할 때

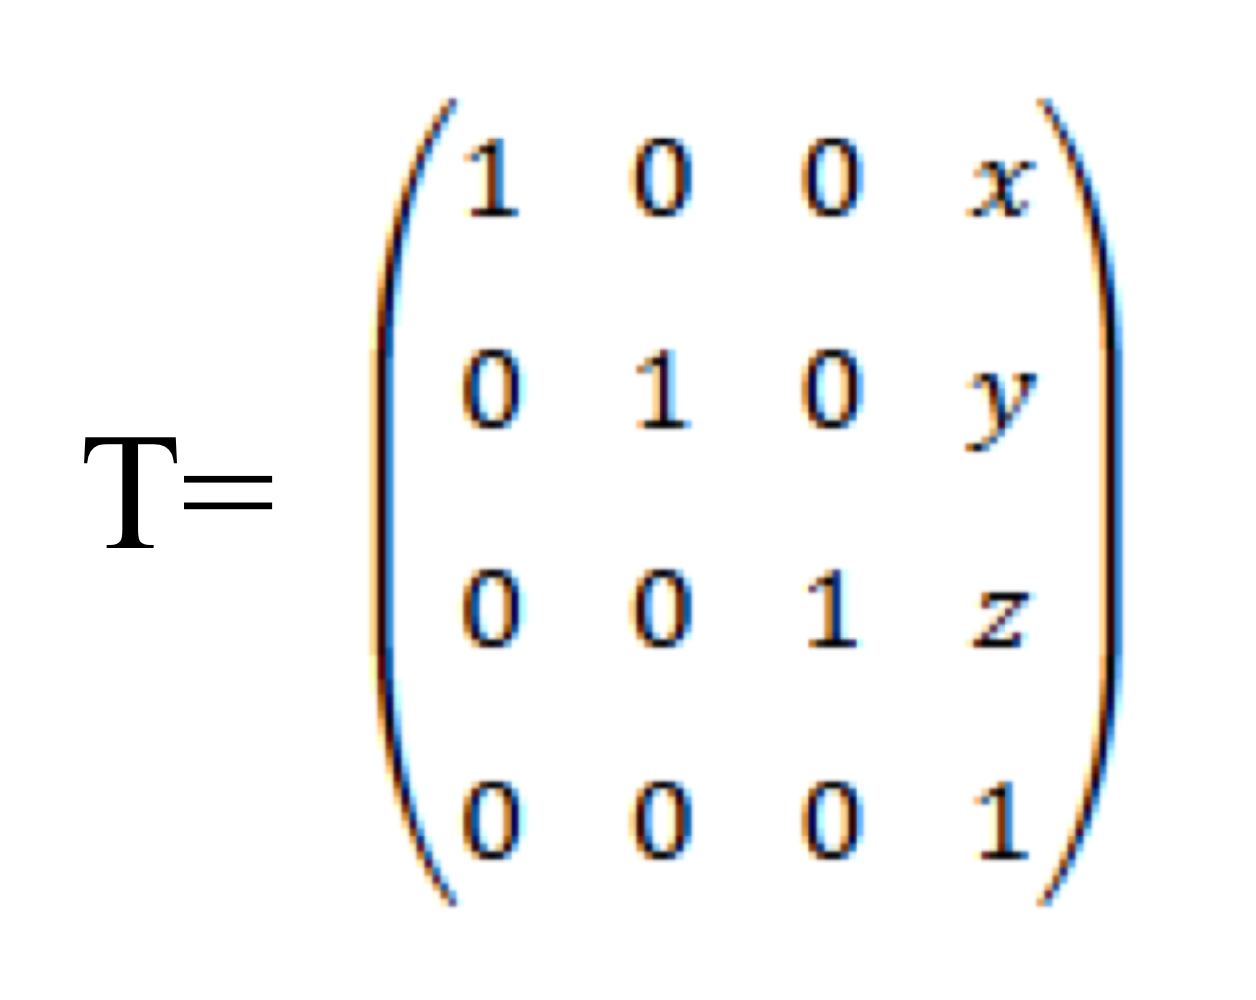
- Translation in 3D를 표현할 때

- Affine Translation in 2D를 3x3 matrix의 곱으로 표현할 수 있었음 마찬가지로
Affine Translation in 3D를 4x4 matrix의 곱으로 표현할 수 있음
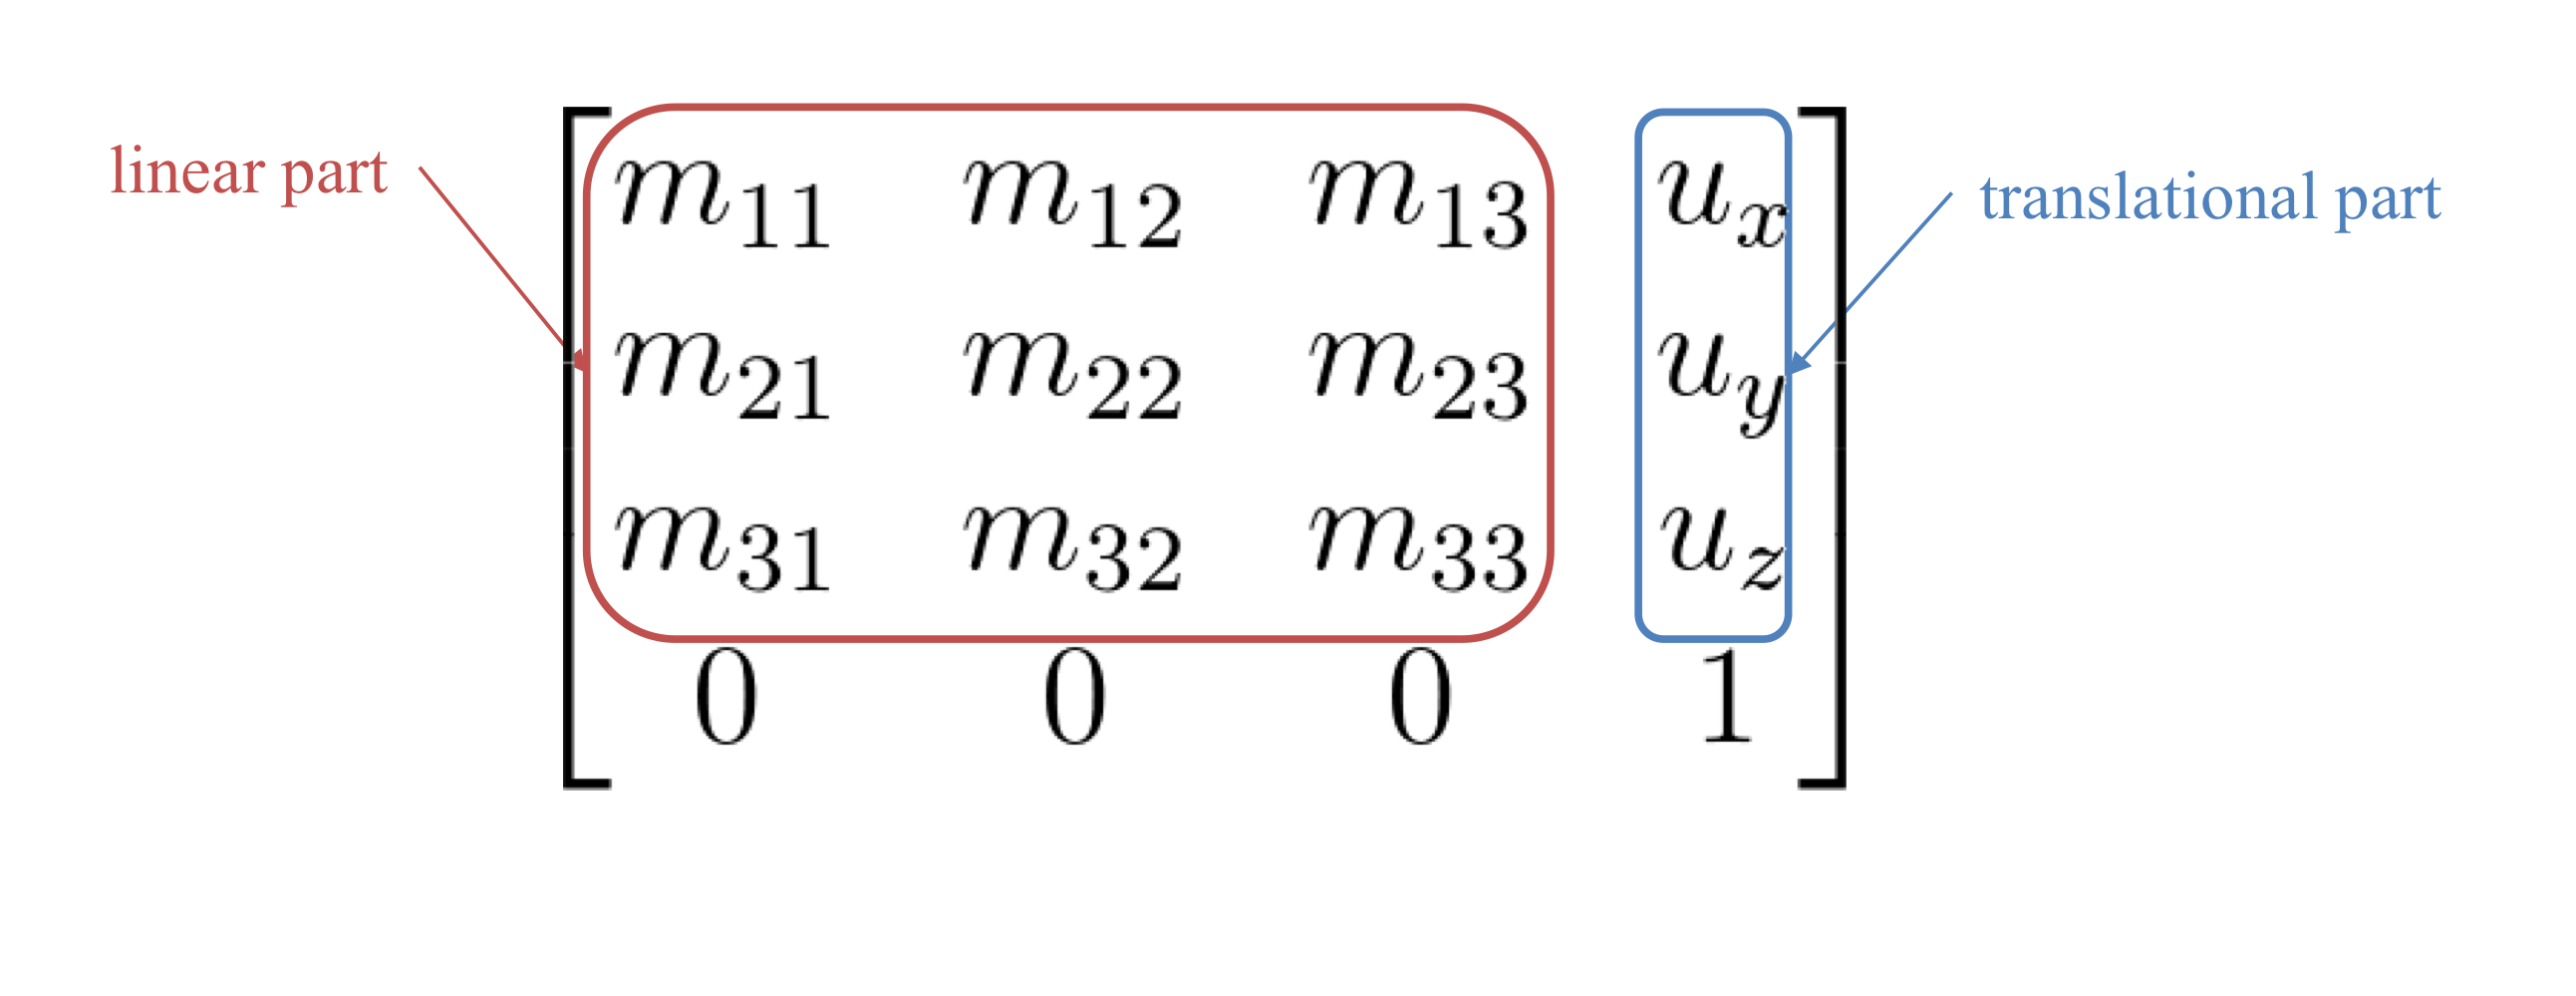
(2D든 3D든, Affine Translation을 matrix으로 표현한 형태는 linear → translation 형태라는걸 기억해라)
Linear Transformation in 3D
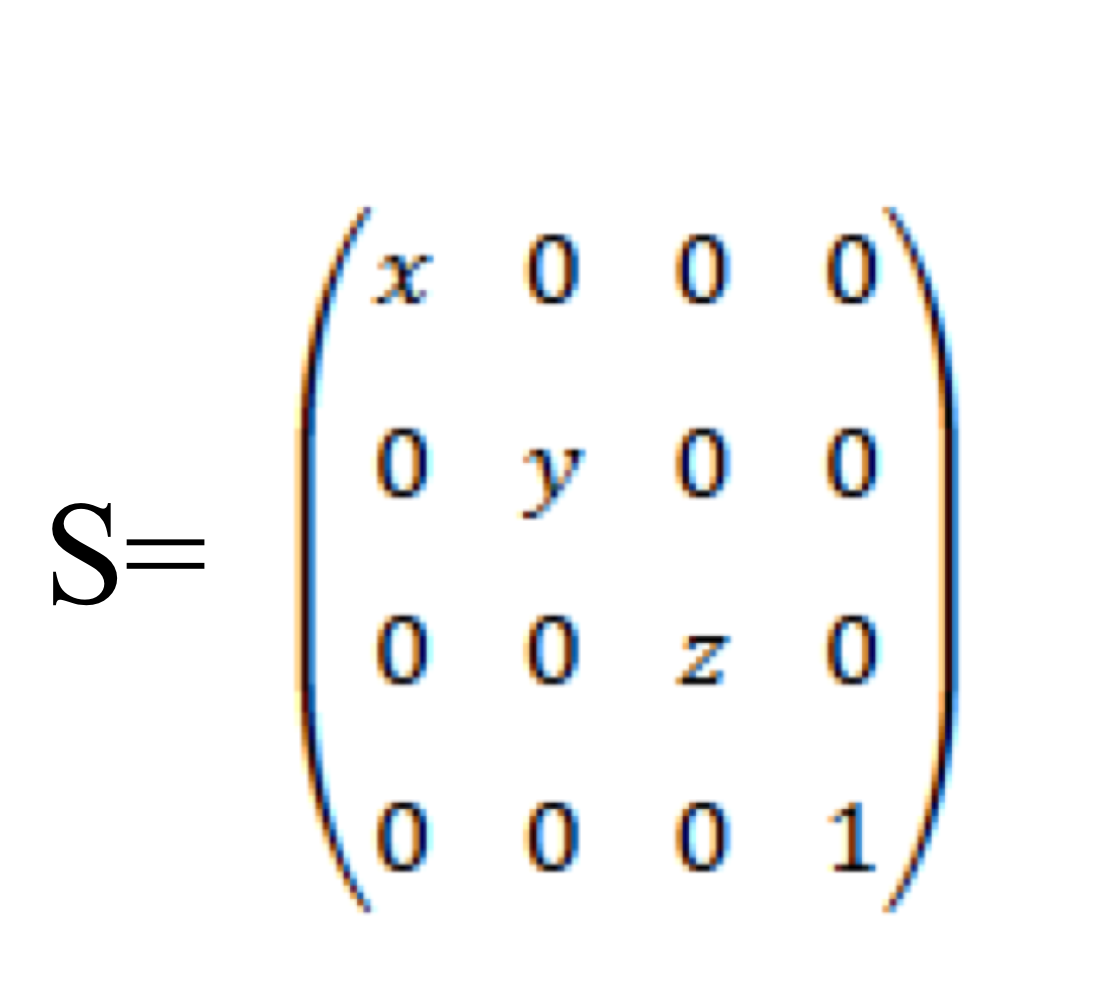
- Scale
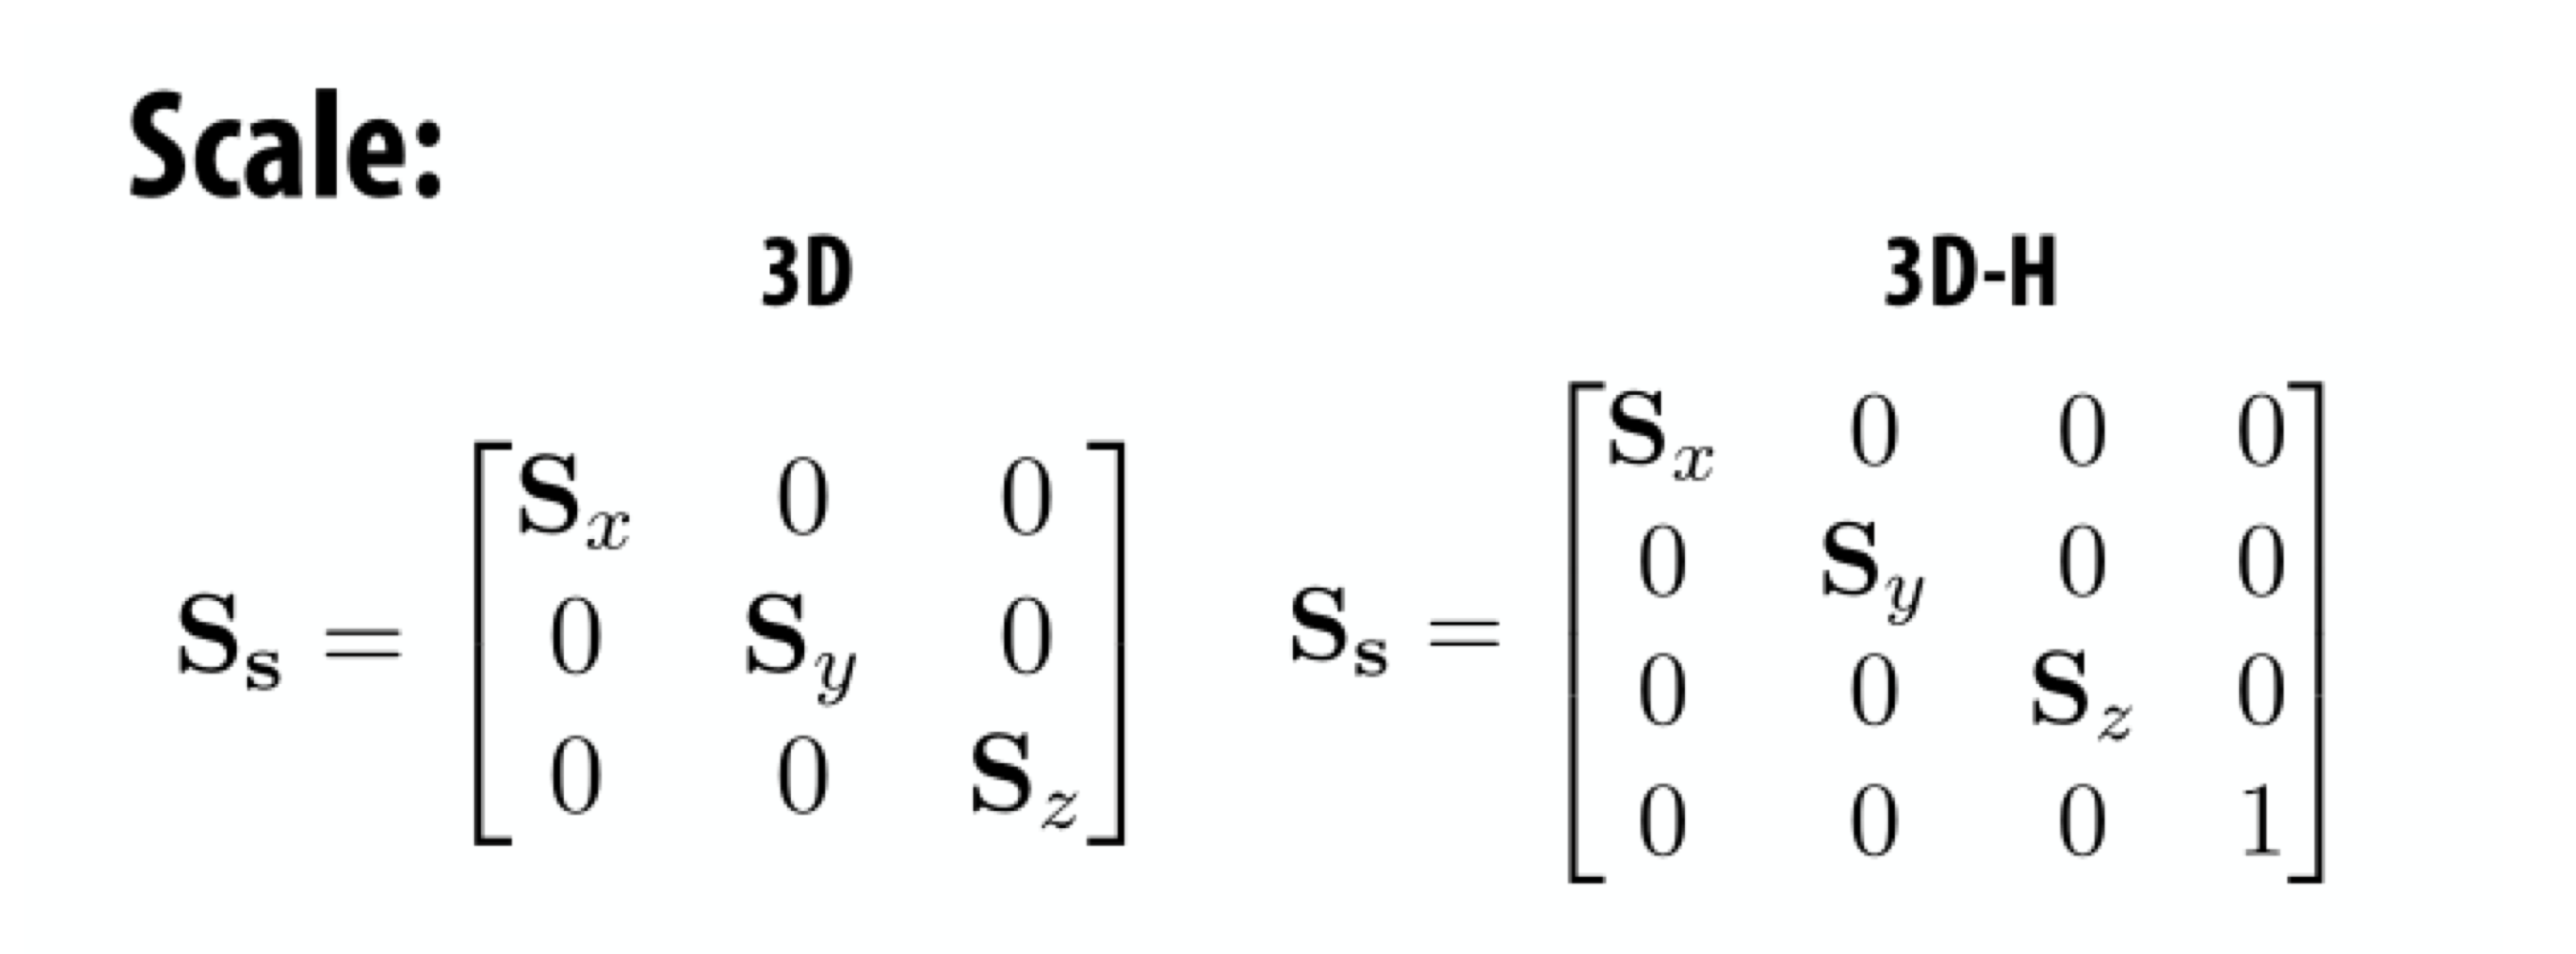
x축으로 S_x 배만큼 변형, y축으로 S_y 배만큼 변형, z축으로 S_z배만큼 변형.
- Shear (어느 쪽 행의 어느쪽 열에 숫자가 추가된건지 관찰하기)
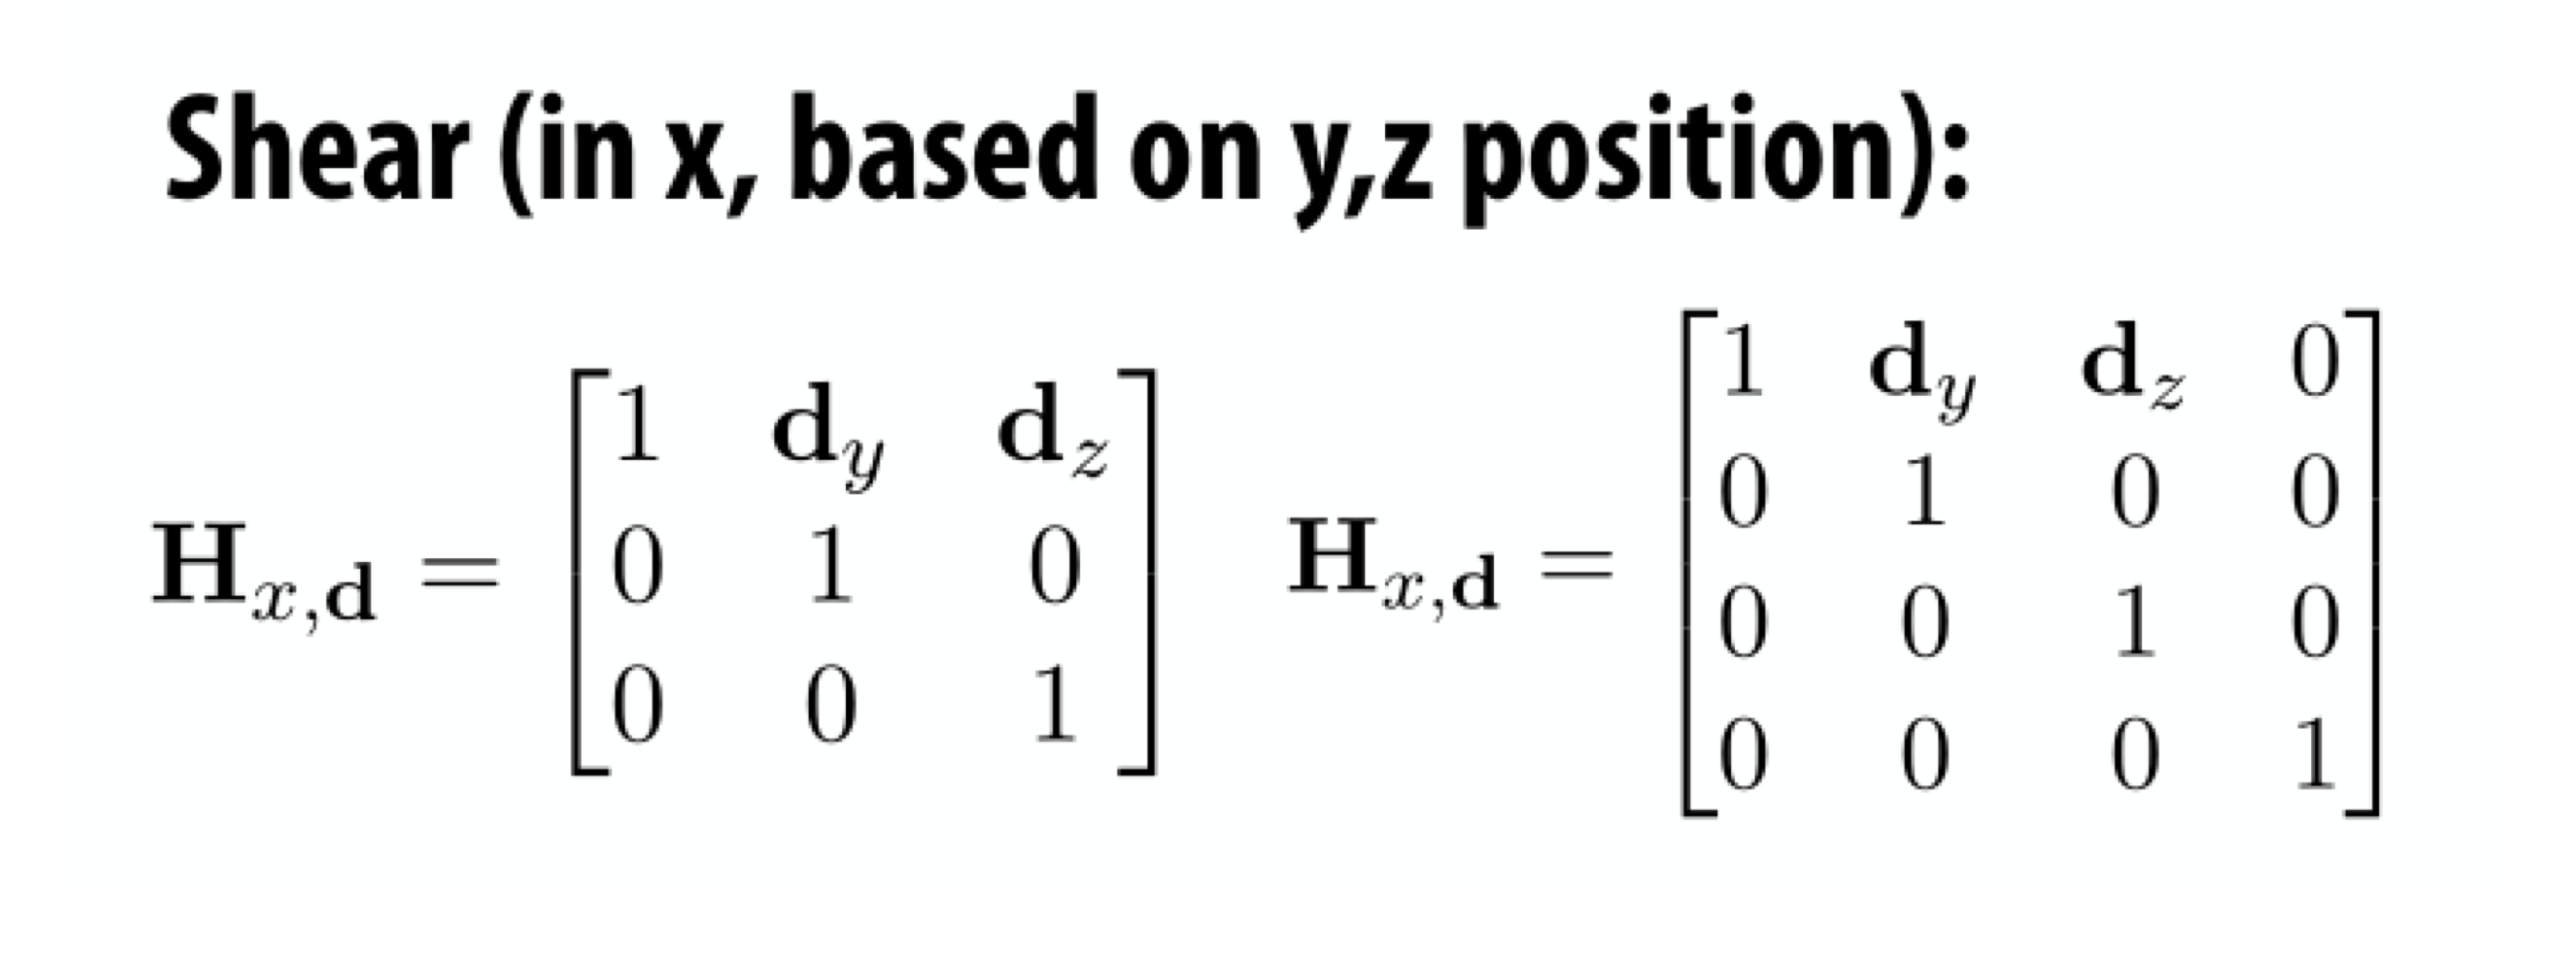
x 축 행에 y열 쪽과 z열 쪽에 숫자가 생김.
→ y와 z 위치를 기준으로 x 축 방향으로 민다는거.
→ d_z = 0이라면 y 위치를 기준으로 x 축 방향으로 미는거
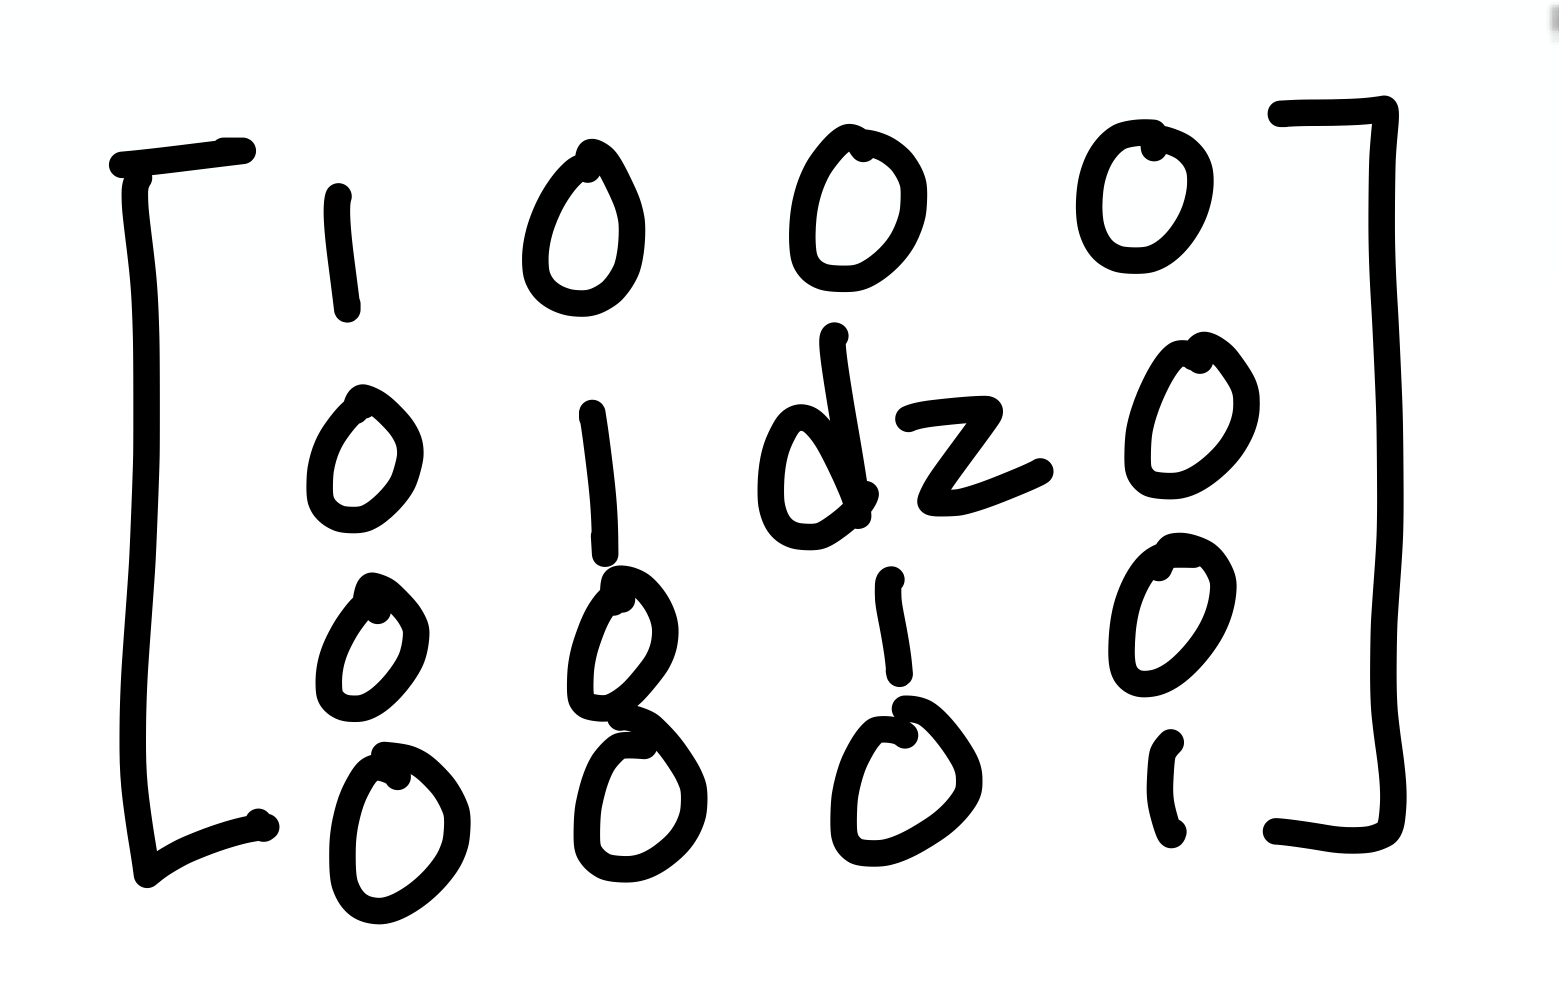
이 경우 y쪽 행의 z열 쪽에 숫자가 추가됨
→ z position을 기준으로 y축 방향으로 미는거
- Rotation
1) Rotation about x axis:

→ x축에 대해 회전하면 x축 (1, 0, 0)은 변하면 안된다. 그래서 x축은 그대로. 나머지 축만 변함

2) Rotation about y axis:

→ y축에 대해 회전하면 y축 (0, 1, 0)은 변하면 안된다. 그래서 y축은 그대로. 나머지는 축만 변함.
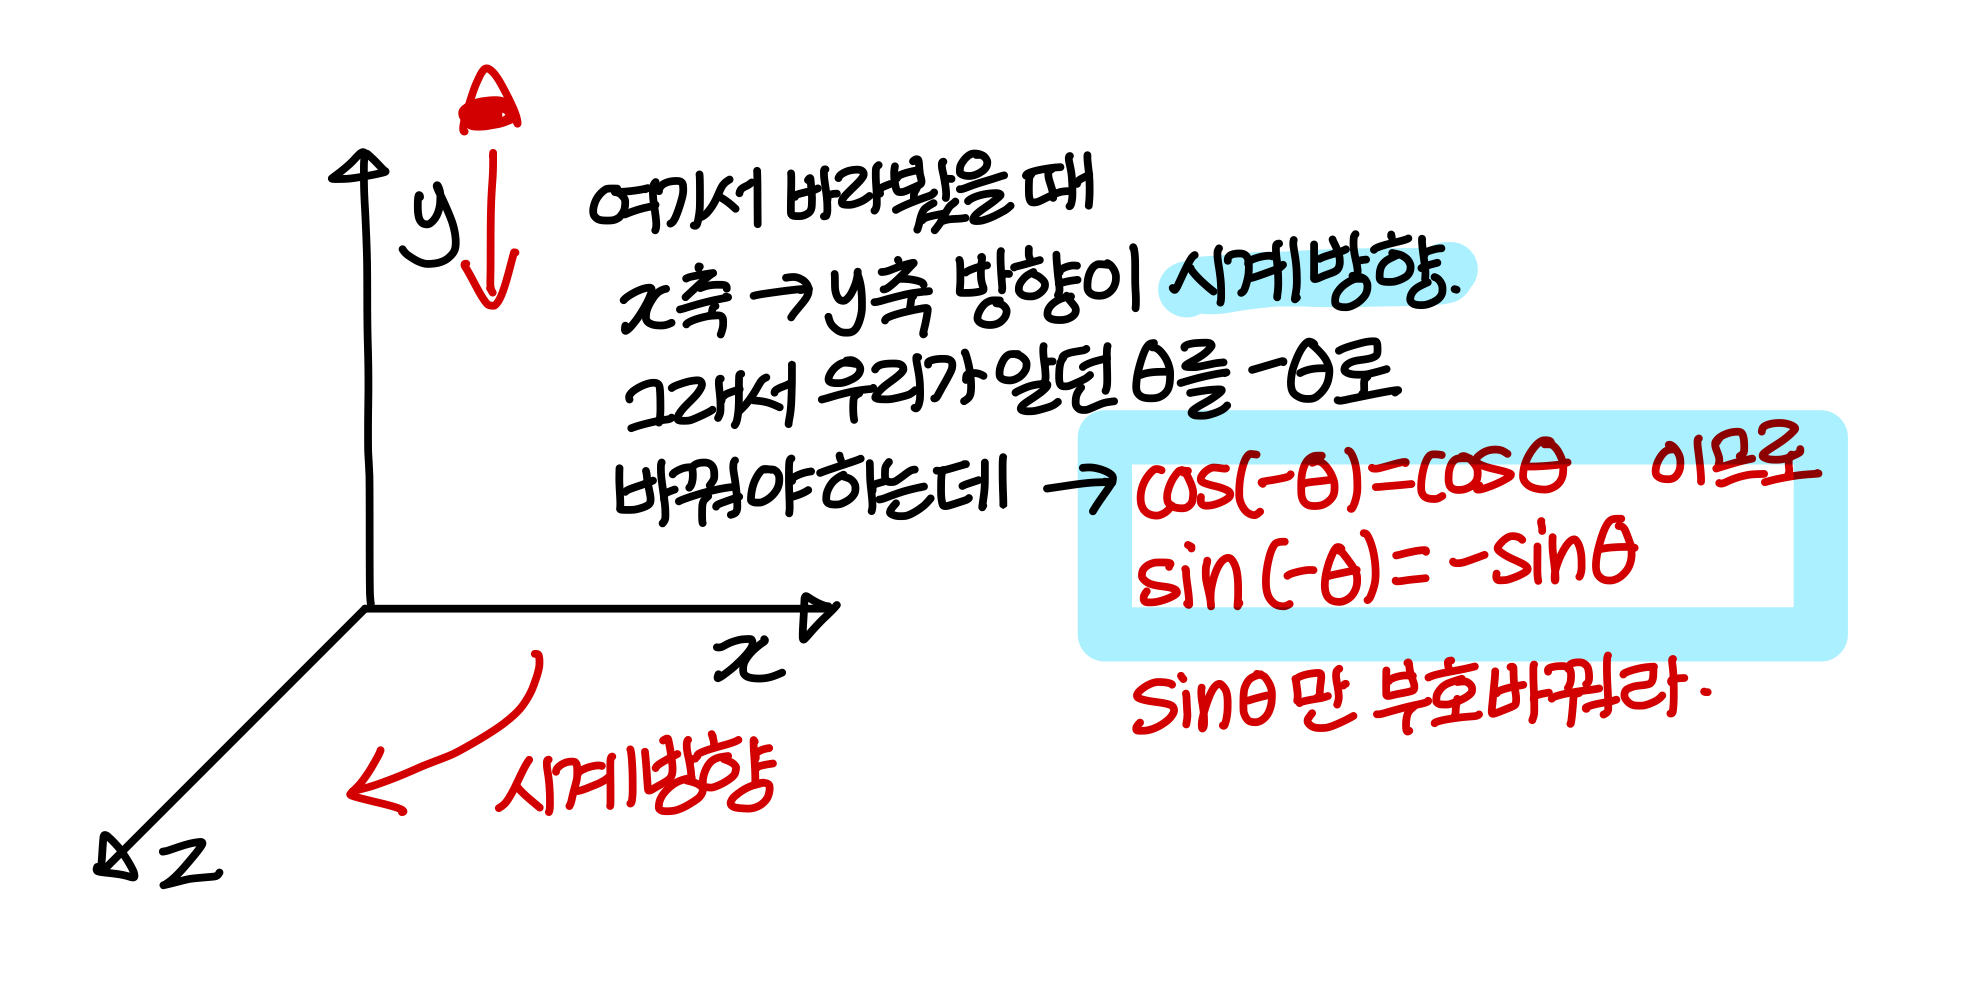
3) Rotation about z axis:
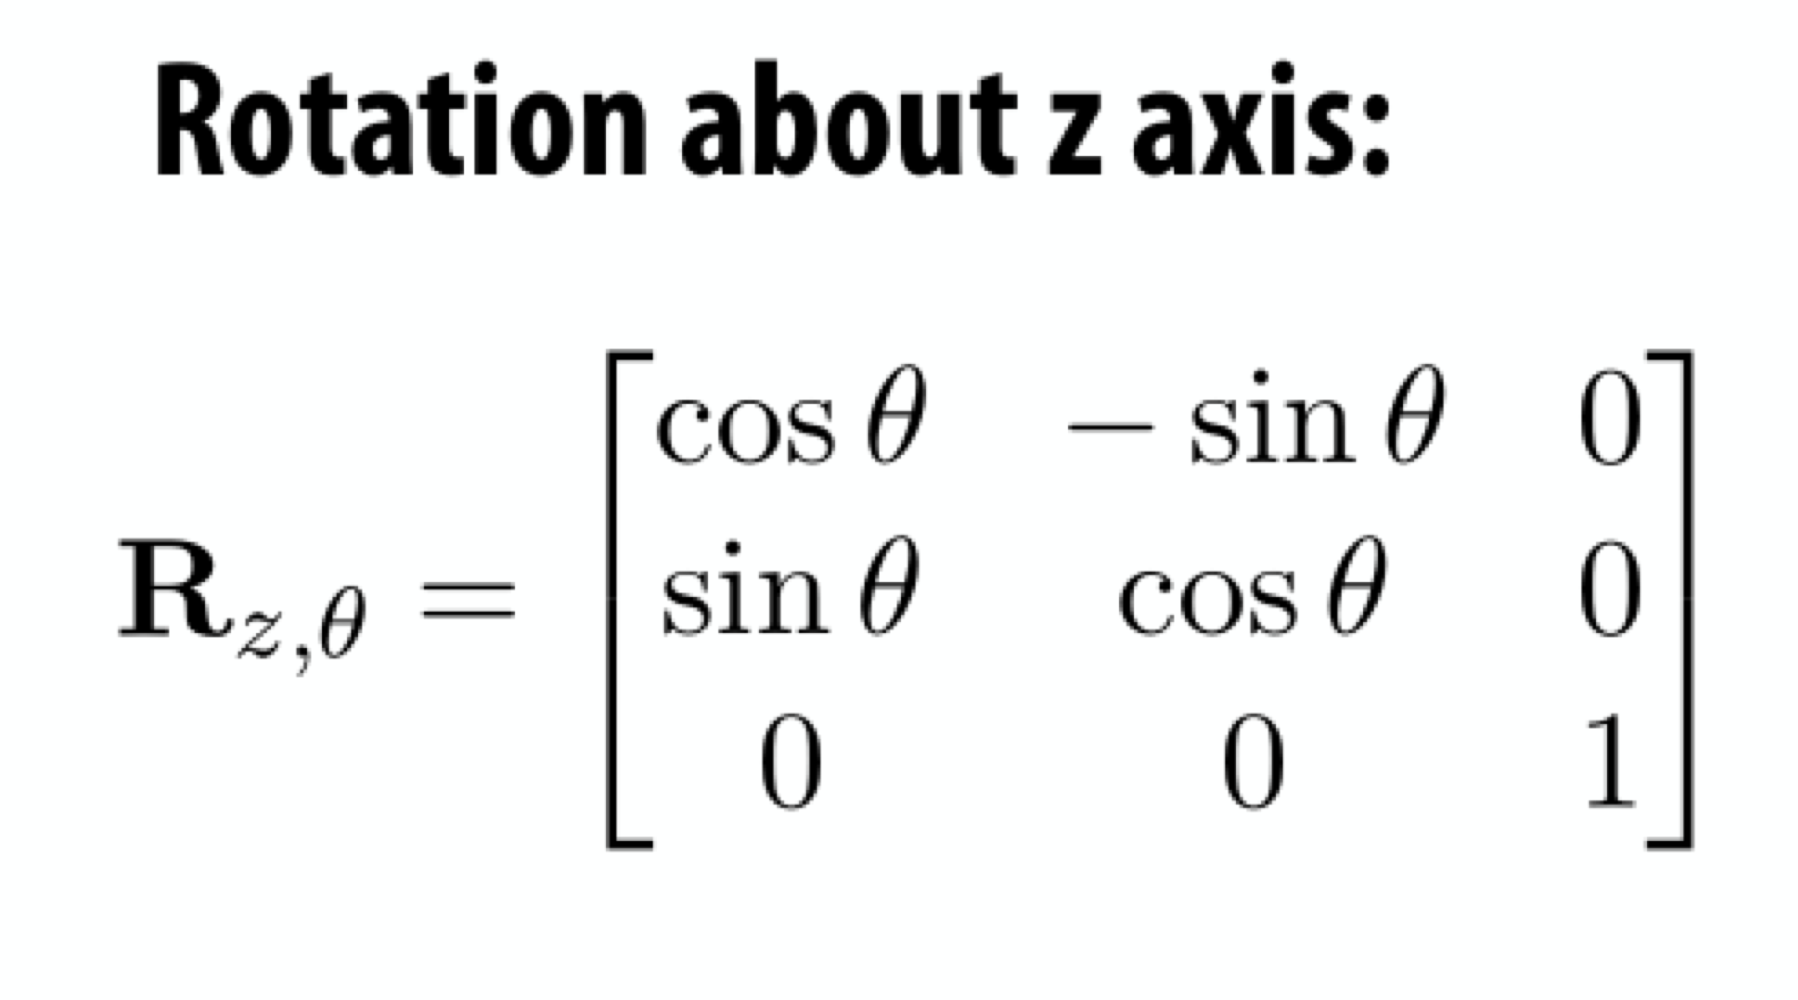
→ z 축에 대해 회전하면 z축 (0, 0, 1)은 변하면 안된다. 그래서 z축은 그대로. 나머지 축만 변함
→ z 축 쪽에서 바라봤을때 x→y 방향은 시계 반대 방향이라 우리가 알던 부호 그대로 하면 된다.
[Practice] 3D Transformation
import glfw
from OpenGL.GL import *
from OpenGL.GLU import *
import numpy as np

def render(M)    # 4X4 matrix
		# enable depth test
		# 카메라에 가까이 있는게 뒤쪽에 있는걸 가리게 하기 위해 필요한거 -> 나중에 배운다. (3D라서 하나봄)
		glClear(GL_COLOR_BUFFER_BIT | GL_DEPTH_BUFFER__BIT)
		glEnable(GL_DEPTH_TEST)

		glLoadIdentity()

		# use orthogonal projection -> 이런것도 한다. 나중에 배움
		glOrtho(-1, 1, -1, 1, -1, 1)

		# rotate "camera" position to see this 3D space better
		# 이것도 나중에 배운다.
		t = glfw.get_time()
		gluLookAt(.1 * np.sin(t), .1 * np.cos(t), 0, 0, 0, 0, 1, 0)
		# 카메라 위치를 sin, cos으로 표현한거임. t는 시간이 갈수록 증가한다

		#draw coordinate system: x in red, y in green, z in blue
		glBegin(GL_LINES)    # 2개씩 끊어서 그 2개를 잇는 라인을 그려줌
		glColor3ub(255, 0, 0)
		glVertex3fv(np.array([0., 0., 0.]))
		glVertex3fv(np.array([1., 0., 0.]))
		glColor3ub(0, 255, 0)
		glVertex3fv(np.array([0., 0., 0.]))
		glVertex3fv(np.array([0., 1., 0.]))
		glColor3ub(0, 0, 255)
		glVertex3fv(np.array([0., 0., 0.]))
		glVertex3fv(np.array([0., 0., 1.]))
		glEnd()

		# draw triangle -> p' = Mp
		glBegin(GL_TRIANGLES)
		glColor3ub(255, 255, 255)   #흰색
		glVertex3fv((M @ np.array([.0, .5, 0., 1.]))[:-1])
		glVertex3fv((M @ np.array([.0, .0, 0., 1.]))[:-1])
		glVertex3fv((M @ np.array([.5, .0, 0., 1.]))[:-1])
		glEnd()
		# 2D든 3D든 homogeneous coordinate를 쓰고 있는데 glVertex함수에 넣을 때는
		#[:-1] 잊지 말기!!!!

def main():
		if not glfw.init()
				return
		window = glfw.create_window(640, 640, "3D TRANS", None, None)
		if not window:
				glfw.terminate()
				return
		glfw.make_context_current(window)
		glfw.swap_interval(1)

		while not glfw.window_should_close(window):
				glfw.poll_events()

				# rotate -60deg about x axis
				th = np.radians(-60)
				R = np.array([[1, 0, 0, 0],
											[0, np.cos(th), -np.sin(th), 0],
											[0, np.sin(th), np.cos(th), 0],
											[0, 0, 0, 1]])

				# translate by (.4, 0., .2)
				T = np.array([[1., 0., 0., .4],
											[0., 1., 0., 0.],
											[0., 0., 1., .2].
											[0., 0., 0., 1.]])

				render(R)    # p' = Rp (삼각형이 -60도 회전한다.)
				# render(T)    # p' = Tp (삼각형이 (0.4, 0.0, 0.2)만큼 평행이동)
				# render(T @ R)    # p' = TRp (삼각형이 -60도 회전하고 평행이동)
glLookAt(eyex, eyey, eyez, atx, aty, atz, upx, upy, upz).
eye는 카메라 위치. at는 바라볼 곳(초점), up은 상향벡터
glfw.swap_interval(1)
→ glfw.swap_buffer()를 calling하기 전에 스크린 refresh를 몇번할지 set해주는거 (하드웨어 레벨의 이야기)
(이렇게 1로 set안하면 제한없이 막 refresh 해서 삼각형 엄청 빠르게 회전인다.
→ 만약 모니터의 refresh rate가 60Hz면 while loop는 1/60 초마다 반복된다.
[Practice] Tips: Use Slicing
numpy로 matrixf를 만들 때 그냥 일일히 입력하는것보다 identity 함수를 통해
4X4 matrix를 만들고 바꿀 것만 입력하는게 편하다.
# 위에서 만든 -60도 회전시키는 matrix를 다시 만들어보자.
th = np.radians(-60)
R = np.identituy(4)
# [a : b] -> index a 부터 index b 전까지 (b는 포함X)
R[:3,:3] = [[1., 0., 0.],
					  [0., np.cos(th), -np.sin(th)],
						[0., np.sin(th), np.cos(th)]]

# 위에서 만든 translate 하는 함수를 만들어보자 (0.4, 0.0, 0.2)
T = np.identity(4)
T[:3, 3] = [.4, .0, .2]
🥵 인덱싱해서 값을 변경할 때는 그냥 [~~~]를 대입하면 된다. np.array([~~~])를 대입할 필요X
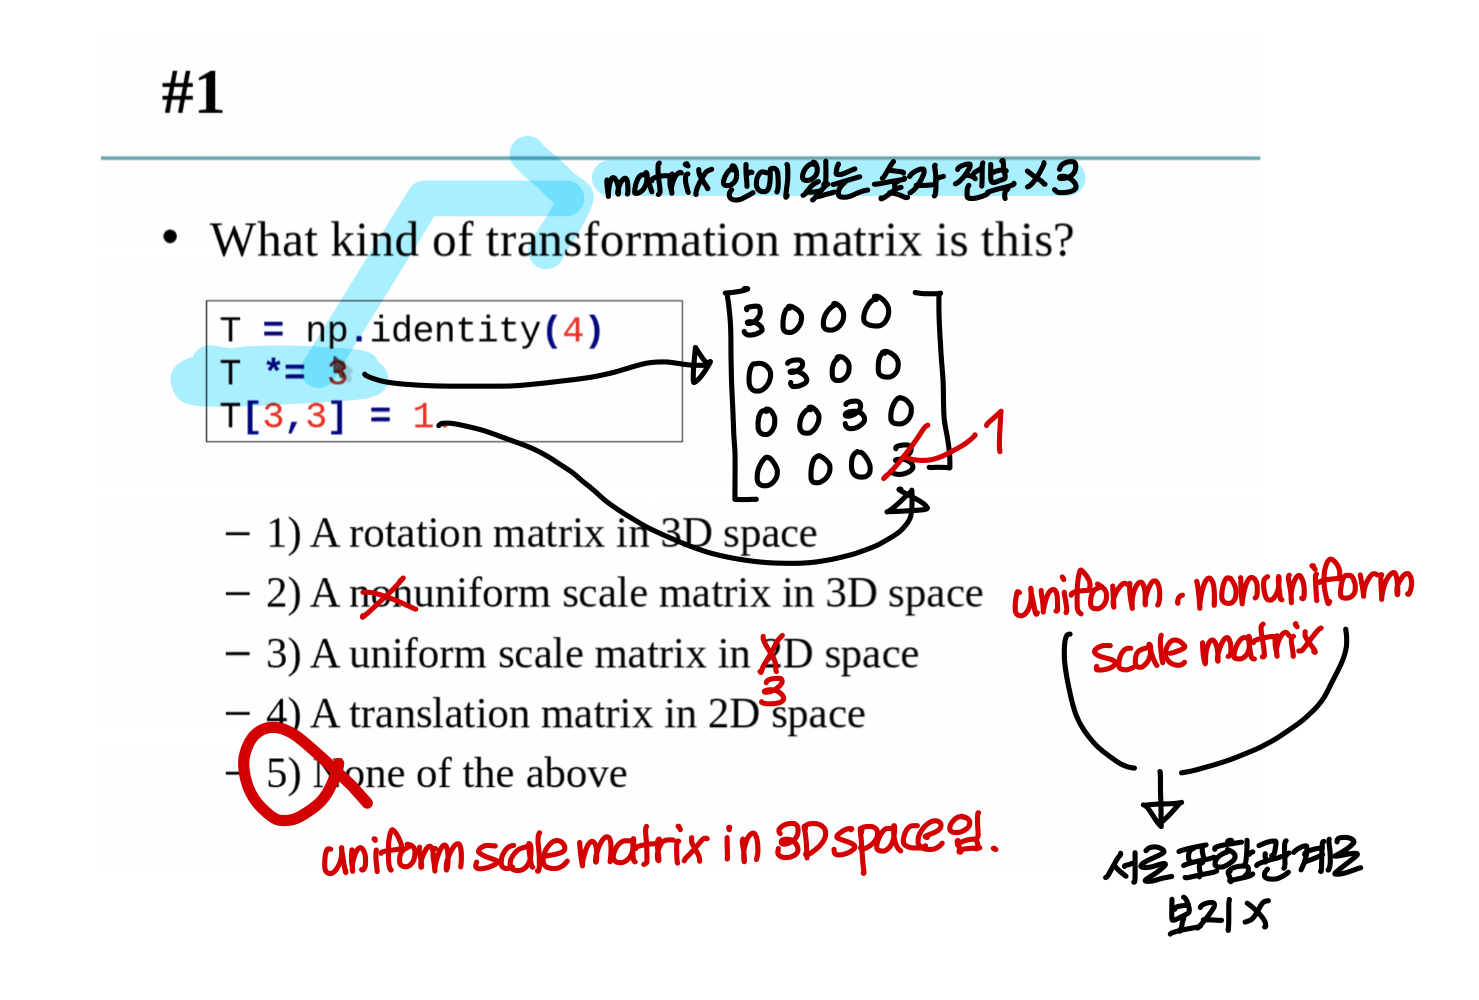
Quiz #1
OpenGL Transformation Functions
OpenGL "Current" Transformation Matrix
- OpenGL은 "state machine"이다.
→ 값을 설정하면 바꾸기 전까지 값을 유지한다.
ex1) current color (빨간색 삼각형 그릴 때 처음 점만 빨간색으로 지정해주면 되었음)
ex2) current transformation matrix (웃긴게 이거 4x4임)
- OpenGL context는 "current" transformation matrix를 메모리 어딘가에 저장하고 있음
- OpenGL은 항상 object를 current transformation matrix와 그린다.
(표현애매. OpenGL always draws an object with the current transformation matrix)
- p가 object의 vertex position이고 C가 current transformation matrix일때
glVertex3fv(p) 라고 하면 → OpenGL은 vertex를 Cp 위치에 그린다.
- (glOrtho()랑 gluLookAt() 쓰는 코드 제외하고) 이때까지 배운 practice code의 current transformation matrix는
identity matrix임.
- glLoadIdentity() → 이게 curent matrix를 identity matrixf로 바꾸는 함수
- current transformation matrix가 identity 일 경우, 모든 object는
NDC(Normalized Device Coordinate) space에 그려진다.
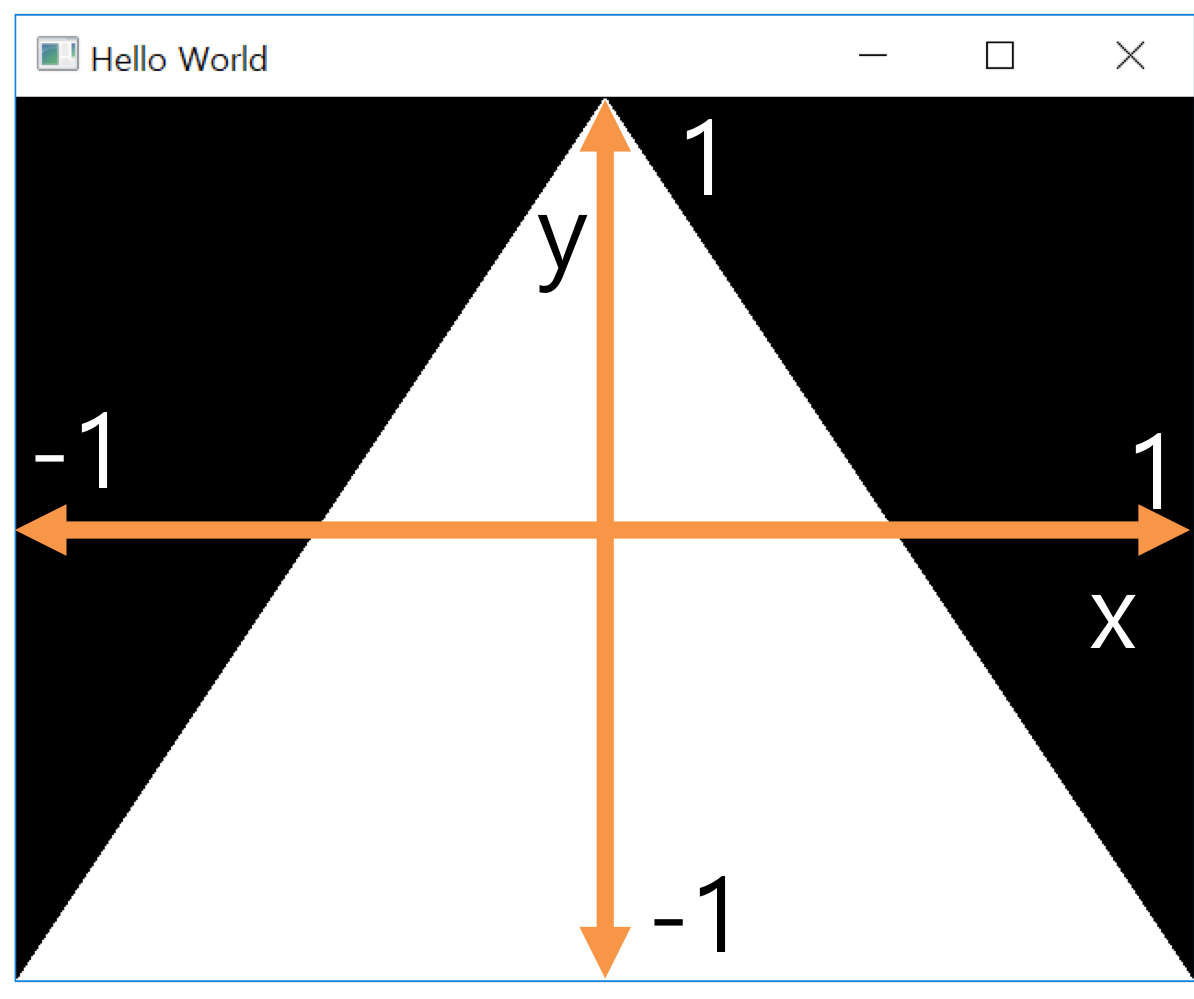
(이렇게 생긴게 NDC space)
OpenGL Transformation Functions
- OpenGL은 current transformation matrix를 manipulate 하는 여러 함수들을 제공한다.
- rendering iteration을 할 때마다, 너는 current matrix를 glLoadIdentity()를 사용해서 set해야한다.
(함수들을 통해서 current matrix를 바꿀거라하더라도)
- glLoadIdentity() 쓰고 나면 이제 다음 함수들을 통해서 current matrix를 manipulate 할 수 있음
→ glScale*()
→ glRotate*()
→ glTranslate*()
→ glMultMatrix*() (Multi가 아니라 Mult임. current matrix를 direct manipulation하는 함수)
(OpenGL은 glShear()와 glReflect()를 제공X. 하고 싶으면 glMultMatrix() 써서 하면 된다.)
[Practice] OpenGL Trans.Functions
import glfw
from OpenGL.GL import *
from OpenGL.GLU import *
import numpy as np

gCamAng = 0

def render(camAng):
		glClear(GL_COLOR_BUFFER_BIT|GL_DEPTH_BUFFER_BIT)
		glEnable(GL_DEPTH_TEST)

		#set the current matrix to the identity matrix
		glLoadIdentity()

		#orthogonal projection을 사용해서 current matrix에 projection matrix를 곱한다.
		#(나중에 배움)
		glOrtho(-1, 1, -1, 1, -1, 1)

		#카메라 포지션을 바꾸는거. current matrix에 camera matrix를 곱한다.
		#(나중에 배움)
		gluLookAt(.1*np.sin(camAng), .1, .1*np.cos(camAng), 0, 0, 0, 0, 1, 0)

		#draw coordinate
		glBegin(GL_LINES)
		glColor3ub(255, 0, 0)
		glVertex3fv(np.array([0., 0., 0.]))
		glVertex3fv(np.array([1., 0., 0.]))
		glColor3ub(0, 255, 0)
		glVertex3fv(np.array([0., 0., 0.]))
		glVertex3fv(np.array)[0., 1., 0.]))
		glColor3ub(0, 0, 255)
		glVertex3fv(np.array([0., 0., 0]))
		glVertex3fv(np.array([0., 0., 1.]))
		glEnd()

		glColor3ub(255, 255, 255)
		#######################################


		#######################################

def key_callback(window, key, scancode, actions, mods):
		global gCamAng
		# rotate the camera when 1 or 3 key is pressed or repeated
		if action == glfw.PRESS or action == glfw.REPEAT:
				if key == glfw.KEY_1:
					gCamAng += np.radians(-10)
				elif key == glfw.KEY_3:
					gCamAng += np.radians(10)

def main():
		if not glfw.init():
				return
		window = glfw.create_window(640, 640, 'OpenGL Trans.Functions', None, None)
		if not window:
				glfw.terminate()
				return
		gflw.make_context_current(window)
		glfw.set_key_callback(window, key_callback)

		while not glfw.window_should_close(window):
				glfw.poll_events()    #이 함수에서 무슨 이벤트인지 검사하고 콜백함수를 호출함
				render(gCamAng)
				glfw.swap_buffers(window)

		glfw.terminate()

		if __name__ == "__main__"
				main()

def drawTRaiangleTransformedBy(M):    # 이 함수는 삼각형을 그리고 우리가 아는 방식으로 변형
		#p1 = (0, .5, 0.), p2=(0, 0, 0), p3=(.5, 0, 0)
		glBegin(GL_TRIANGLES)
		glVertex3fv((M @ np.array([.0, .5, .0, 1.])) [:-1])
		glVertex3fv((M @ np.array([.0, .0, .0, 1.])) [:-1])
		glVertex3fv((M @ np.array([.0, .0, .5, 1.])) [:-1])
		glEnd()

def drawTriangle():
		glBegin(GL_TRIANGLES)
		glVertex3fv(np.array([.0, .5, .0]))
		glVertex3fv(np.array([.0, .0, .0]))
		glVertex3fv(np.array([.5, .0, .0]))
glEnd()- if action == glfw.PRESS or action == glfw.REPEAT: → glfw.REPEAT 가 정확히 무슨 행동일까..?
- 다시 기억하기 OpenGL은 그리는걸 제공하는거고 glfw는 이벤트 핸들링 및 window 등을 제공하는거
glScale*()
- glScale*(x, y, z): current matrix에 scaling matrix를 곱하는거
- current matrix가 C일 때 glScale*(x, y, z)를 부르면 C ← CS가 된다. (C도 4X4임)
(glScale()가 아니라 glScalef를 쓰더라)
# 둘의 효과는 같다
#1)
glScalef(2., .5, 0.)
drawTraignle()

#2)
S = np.identity(4)
S[0,0] = 2.
S[1,1] = .5
S[2,2] = 0.
drawTriangleTransformedBy(S)
glRotate*()
- glRotate*(angle, x, y, z): current matrix에 rotation matrix를 곱한다.
→ angle: 단위가 degree다!!!! (라디안이 아니라서 변형해줄 필요가 없음)
→ x, y, z: x축, y축, z축을 의미한다. 회전 축 벡터의 값을 의미한다.(아직 무슨 소린지 모르겠음)
- glRotate*(angle, x, y, z) 콜하고 나면 current matrix는 C ← CR이 된다. (R도 4차임)
#1)
glRotatef(60, 1, 0, 0).  # x축에 대해 회전한다는 의미임. 단위를 degree로 넣어줬음
drawTraingle()

#2)
th = np.radians(60)   # 단위를 radian 단위로 넣어줘야한다.
R = np.identity(4)
R[:3,:3] = [[1., 0., 0.],
					  [0., np.cos(th), -np.sin(th)],
						[0., np.sin(th), np.cos(th)]]

drawTriaignleTransformedBy(R)
glTranslate*()
- glTranslate*(x, y, z): current matrix에 translation matrix를 곱함.
- glTranslate call 하고 나면 C ← CT
#1)
glTranslatef(.4, 0., .2)
drawTriangle()

#2)
T = np.identity(4)
T[:3,3] = [.4, 0., .2[
drawTriangleTransformedBy(T)
glMultMatrix*()
- glMultMatrix*(m)
- glMultMatrix call하고 나면 C ←CM
def render():
		~~~~
		#rotate 30 deg about x axis
		th = np.radians(30)
		R = np.identity(4)
		R[:3,:3] = [[1., 0., 0.]
								[0., np.cos(th), -np.sin(th)],
								[0., np.sin(th), np.cos(th)]]


		#translate by (.4, 0., .2)
		T = np.identity(4)
		T[:3,3] = [.4, 0., .2]

		glColor3ub(255, 255, 255)

		#밑에 3개 결과 모두 똑같다. T하고 R을 하는 결과를 가져온다.
		#1)
		glMultMatrixf(R.T)
		glMultMatrixf(T.T)
		drawTriangle()

		#2)
		glMultMatrixf((R @ T).T)
		drawTriangle()

		#3)
		drawTriangleTRansformedBy(R @ T)
(R @ T).T = R.T @ T.T
Composing Transformation using OpenGL Functions
- current matrix가 identity I라고 하자.
glTranslatef(x, y, z)    #T
glRotatef(angle, x, y, z)    #R
drawTriangle()    #p
→ 다음 코드를 실행하면 current matrix는 TR이 된다.
- 삼각형의 vertex p는 p' = (TR)p 에 그려진다.
- p가 R에 의해 rotate 되고 T에 의해 translate 된 위치임
Quiz #2

Using numpy matrix vs Using OpenGL transformation matrix
- using numpy
CPU가 matrix multipliation을 진행한다.
- Using OpenGL transformation matrix
그래픽 라이브러리 GPU에서 matrix multilication을 진행한다.
numpy matrix를 쓰는것보다 훨씬 빠르다.
(근데 사실 glVertex3f()로 일일히 점 찍는 경우 거의 없음. 나중에 vertex array 배우는데 이거 써서
하면 훨씬 빠르게 그릴 수 있다.)
Fundamental Idea is Most Important
- glScalef(), glRotatef(), glTranslatef()는 legacy OpenGL에서만 쓸 수 있음
→ modern OpenGL에선 못쓴다.
→ 그러니까 이런 함수 쓰는게 중요한게 아니라 기본 아이디어가 제일 중요한거
Affine Space & Coordinate Free Concepts
Coordinate-invariant(Coordinate-free)
- 전통적으로 컴퓨터 그래픽스 패지지는 homogeneous coordinates 에서 구현되었음
- 우리 이제 affine space 와 coordinate-invariant geometric programming concept 볼거임
→ 이거 우리가 배웠던 homogeneous coordinate와 연결되는 개념이다.
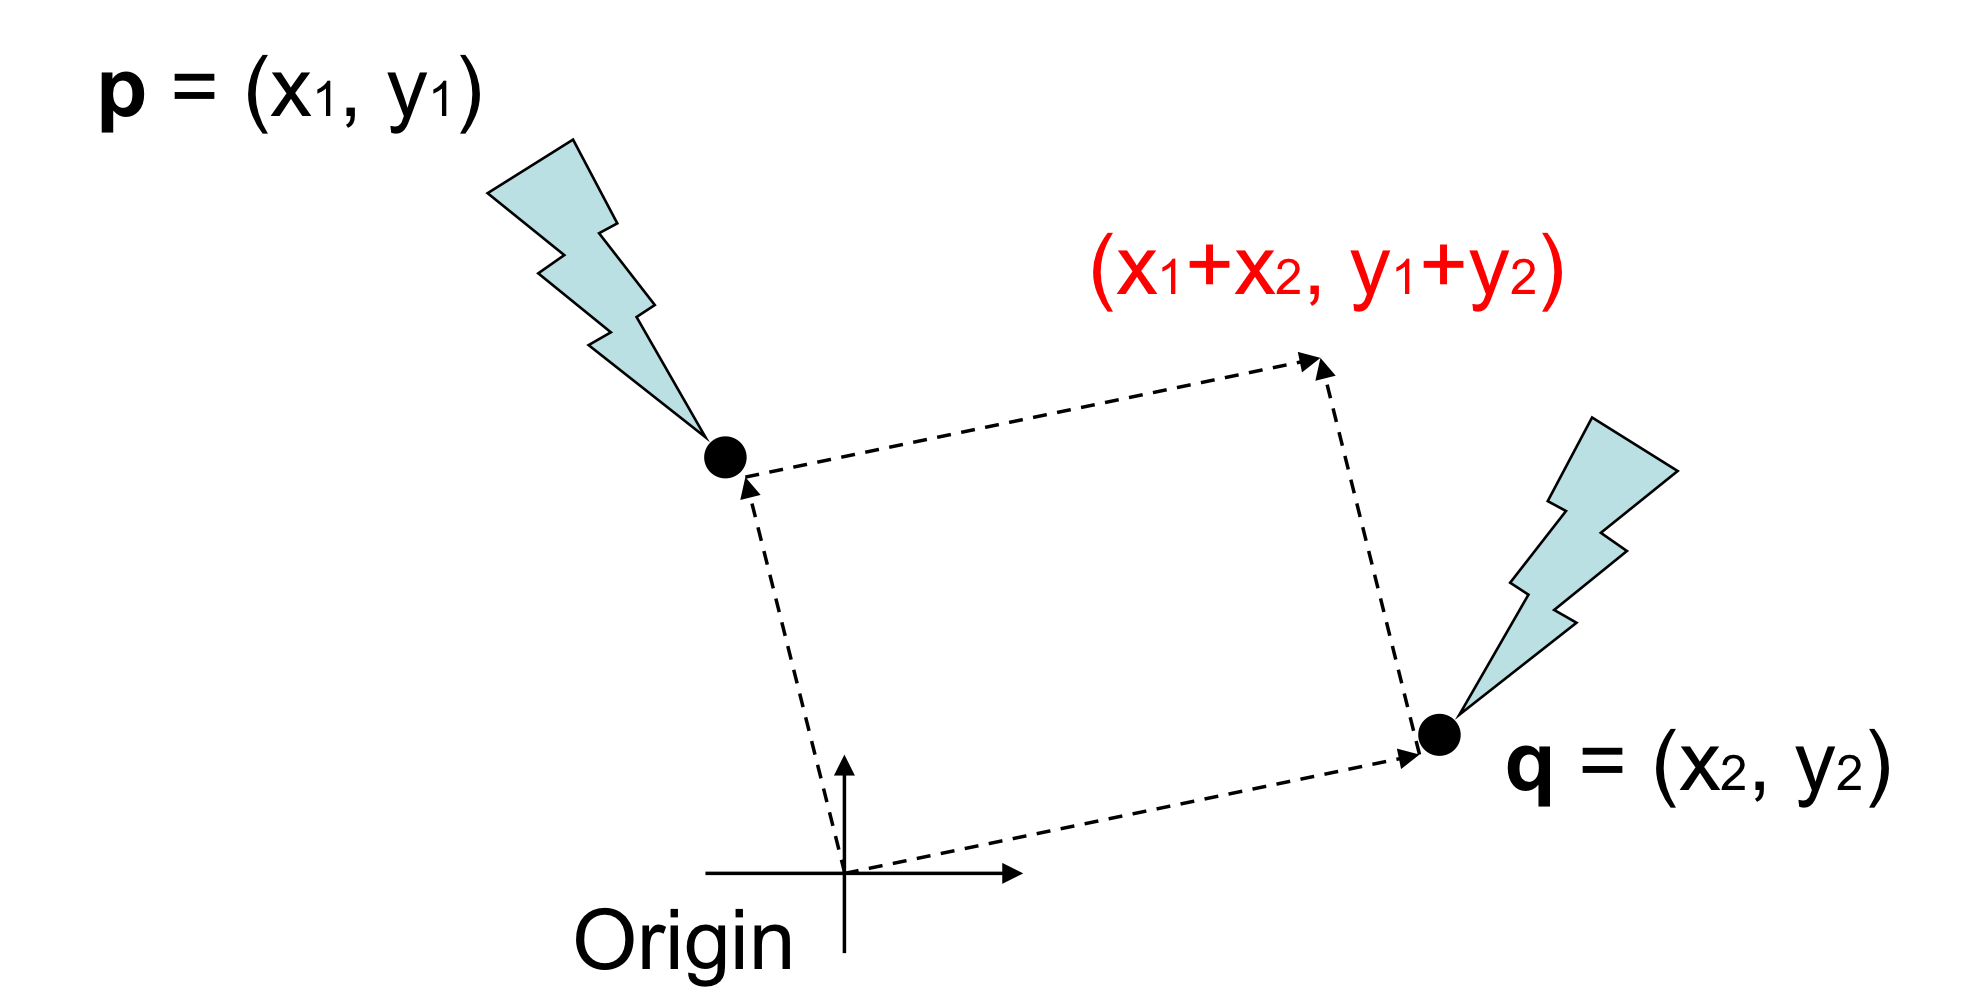
- coordinate-free : 좌표계와 상관없이 동일하게 동작해야하는거
두 point의 합 = (x_1 + x_2, y_1 + y_2)
→ 이게 기하학적으로 의미가 있을까?
→ 이 값은 coordinate에 따라 다름
→ 따라서 coordinate free라고 할 수 없음
두 벡터의 합
→ 원점 위치에 따라 결과가 달라지니까
→ coordinate free라고 할 수 없음
→ 따라서 coordinate free 개념에서 두 point의 합이나 두 벡터의 합은 말이 안되는 operation임
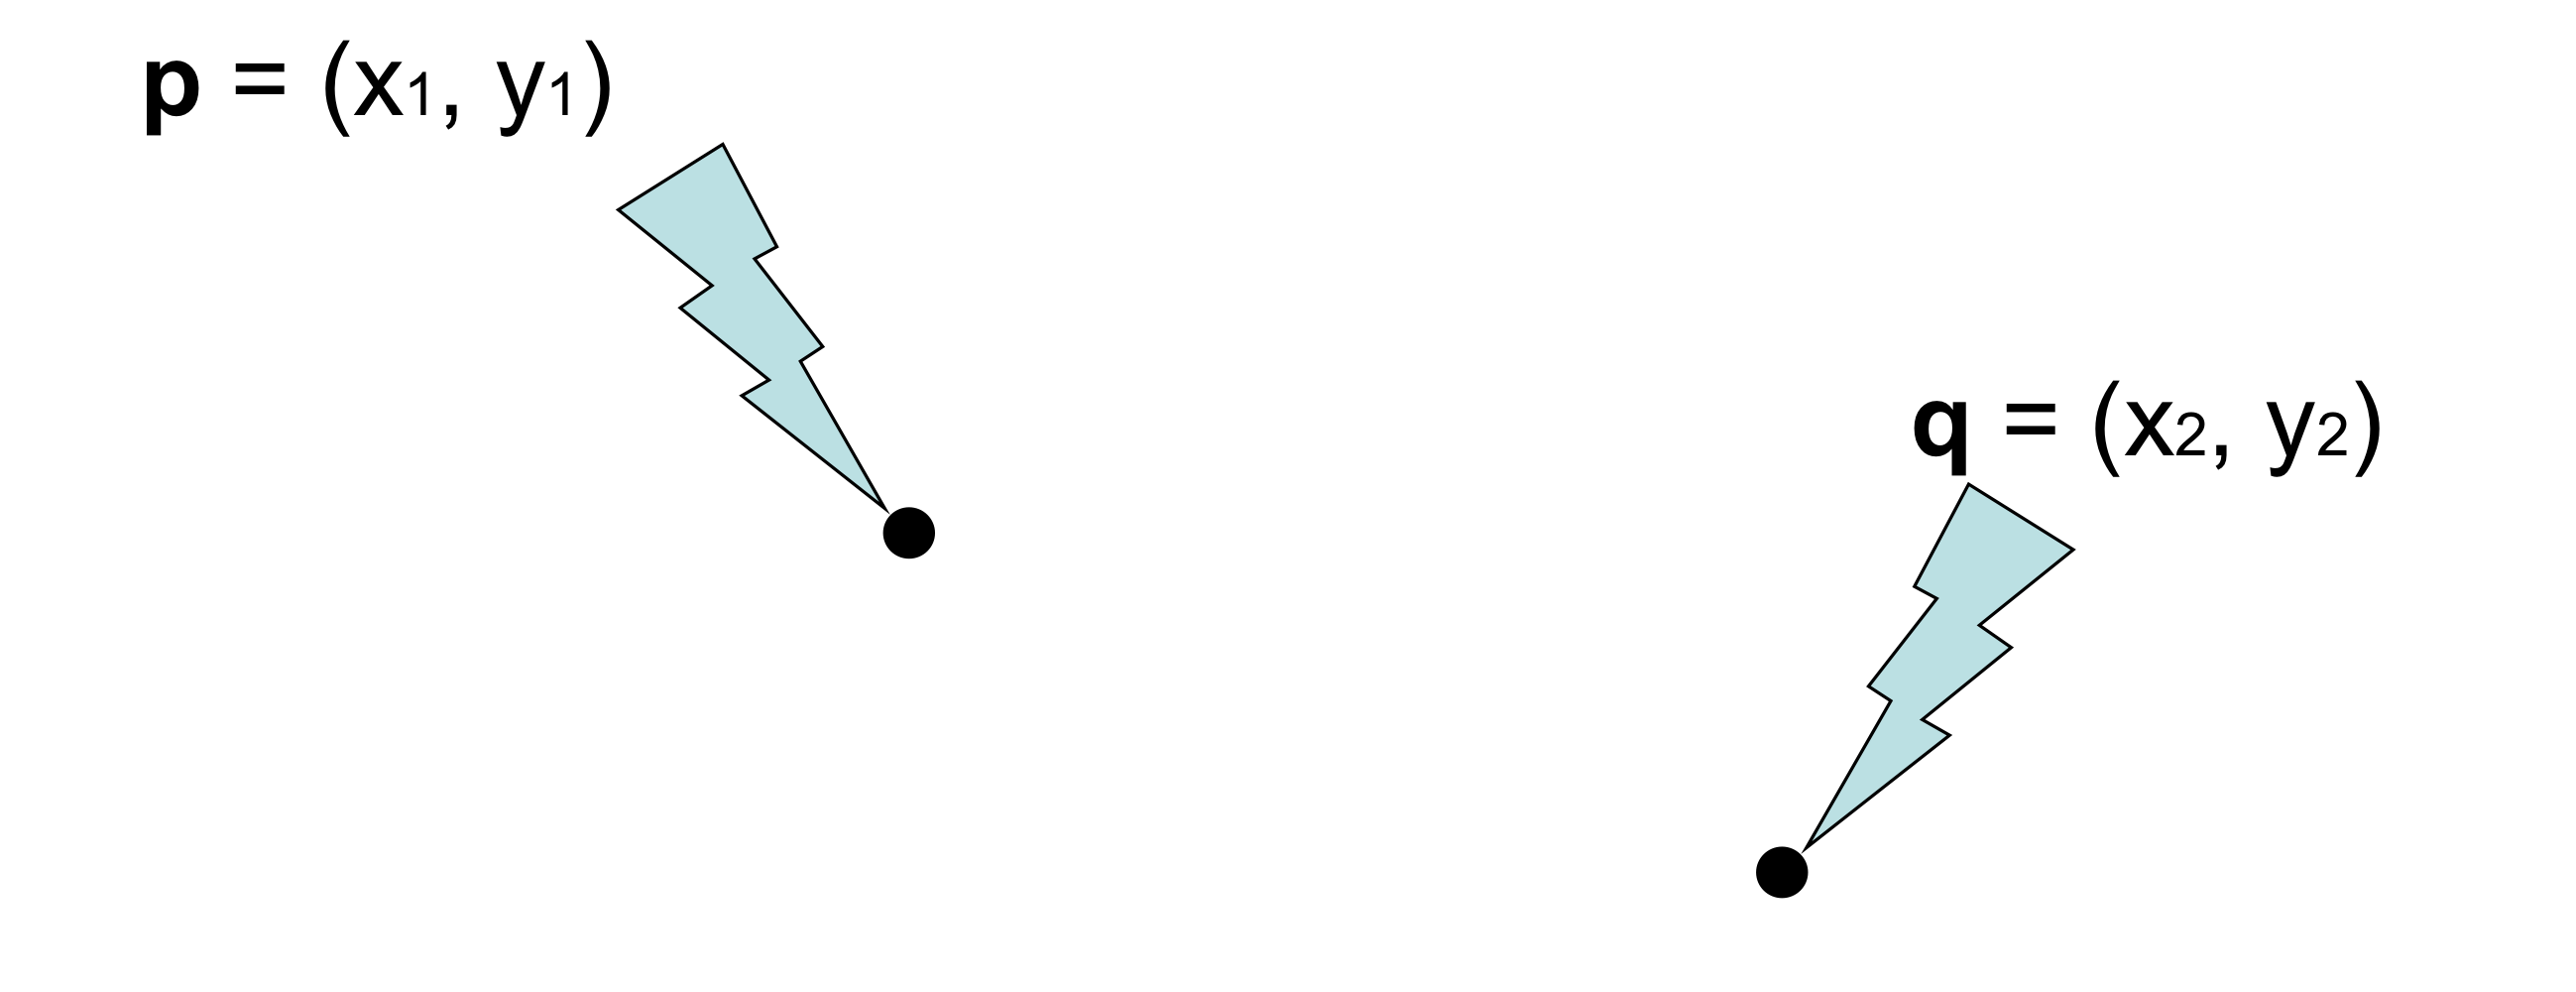
Points and Vectors
- point: coordinate values로 명시되는 position
- vector: 두 포인트 사이의 차이로 명시된다.
- origin이 명시된다면 point는 vector from origin 으로 나타낼 수 있음
- coordinate free 에서 point와 vector를 구분하므로 point는 vector가 아님. 서로 다른 개념이다.
Point & Vectors are Different
- 수학적으로 그리고 물리적으로 다른 개념임
- Point는 location in space
- Vectors는 displacements in space
이제 조금 관점을 바꿔서 Vector space와 affine space에 대해 살펴보자.
Vector and Affine Spaces
- Vector space
→ 벡터와 관련된 operation을 포함
→ Point 존재x
→ set of vectors + two operation(벡터 덧셈, 벡터의 스칼라곱)으로 이루어져있다.
(벡터끼리의 뺄셈은 말을 안했지만 벡터 스칼라곱 되고 벡터 덧셈 되니까 -1 곱하고 더하면 그게 뺄셈)
→ vector들의 linear combination도 vector다!
따라서 vector 들끼리 연산을 한 결과도 여전히 vector space 안에 있다.

- Affine space
→ vector space의 superset
→ vector, points, 그리고 관련된 operation을 포함한다
→ set of points + 관련된 벡터 space + two operation(두 포인트의 difference, 포인트에 벡터 더하기)로 구성
(벡터 space를 포함하니까 당연히 벡터덧셈과 벡터의 스칼라곱을 포함)
Coordinate-Free Geometric Operation
(아예 coordinate free라고 할순 없는듯. 위에서 봤듯이 coordinate 바뀌면 vector sum 결과 바뀌는거 봤잖아.)
(여기서 말하는건 geometric 적으로 coordinate free라는거)
→ Addition, Subtraction, Scalar multiplication 은 coordinate에 free한 geometric operation이다.
- Addition

벡터 + 벡터 = 벡터
포인트 + 벡터 = 포인트
2. Subtraction
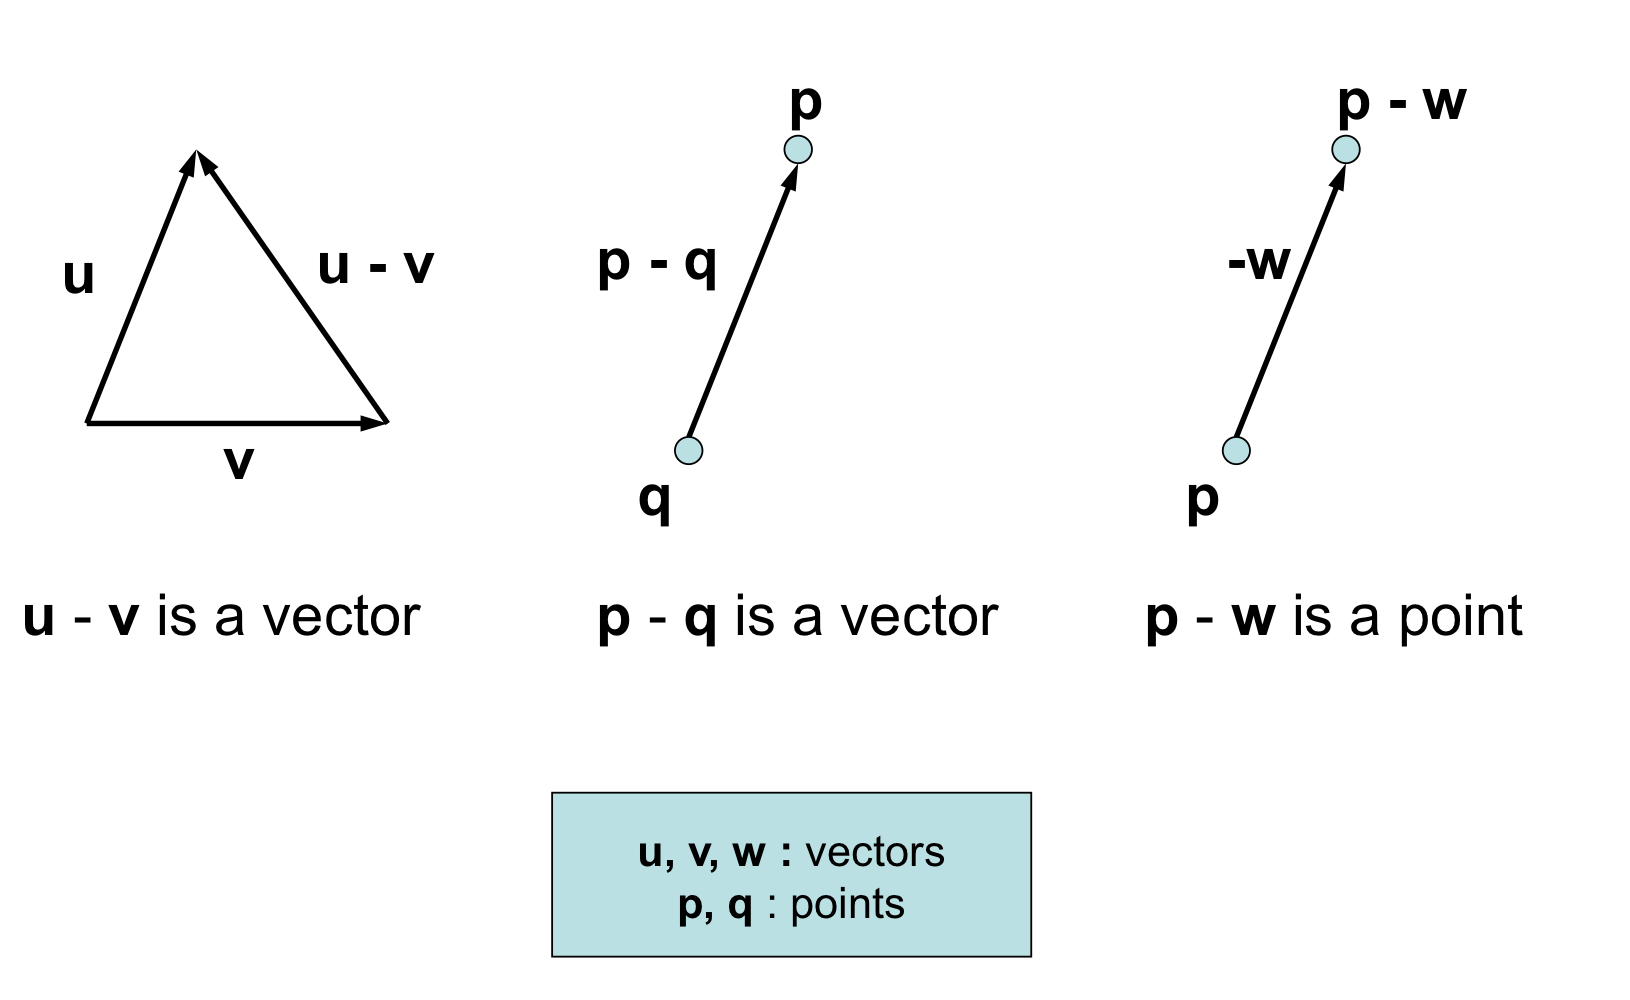
벡터-벡터 = 벡터
포인트-포인트 = 벡터
포인트-벡터 = 포인트
3. Scalar Multiplication
scalar * vector = vector
1 * point = point
0 * point = vector
c * point = (undefined ) if (c ≠ 0, 1)
→ 0이나 1이 아닌 임의의 스칼라를 곱한건 geometric적으로 의미가 없다. 이게 의미가 있으려면 좌표계가 정해져있어야한다.
즉, coordinate free geometric operation 이 아닌것.
Affine Frame
- set of vector {v_i}는 관련된 vector space의 basis들이다.
- o는 frame의 원점이다.
- N은 affine space의 dimension임
- 어떤 point p든 다음과 같이 표현될 수 있음

- 어떤 벡터 v든 다음과 같이 표현될 수 있음

Summary
affine space에서
point + point = undefined
point - point = vector
point +- vector = point
vector +- vector = vector
scalar * vector = vector
scale * point = point (scalar =1)
= vector (scalar = 0)
= undefined (otherwise)
Points & Vectors in Homogeneous Coordinate
3D space를 Homogeneous Coordinate로 나타냈을 때
→ 포인트는 (x, y, z, 1) 벡터는 (x, y, z, 0)으로 나타낸다.
→ 이랬을 때 affine frame coordinates 의 behavior는 우리의 직관과 잘 맞아떨어진다.
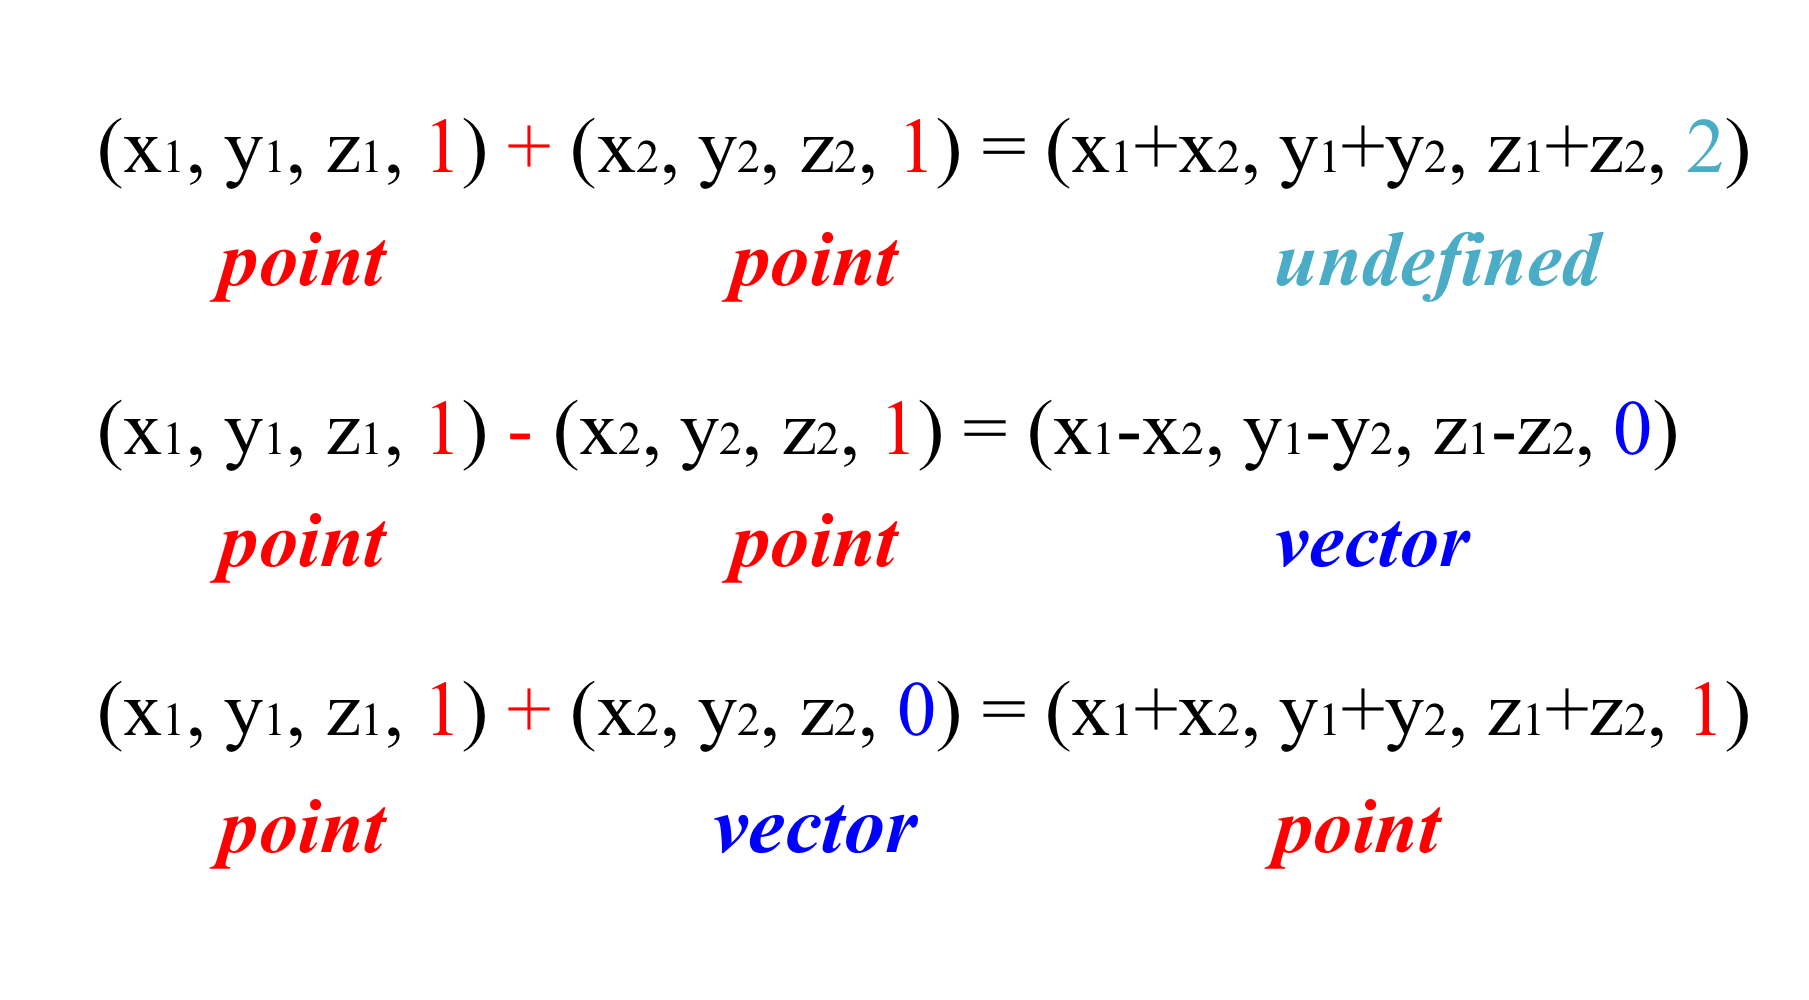
→ 포인트끼리 더하면 맨 끝자리 2 되어서 Undefined임을 나타내주고
→ 포인트끼리 덧셈 해주면 맨 끝자리 0 되어서 vector 임을 나타내주고
→ 포인트에 벡터 더하면 여전히 맨 끝자리 1이라서 포인트 나타내주고
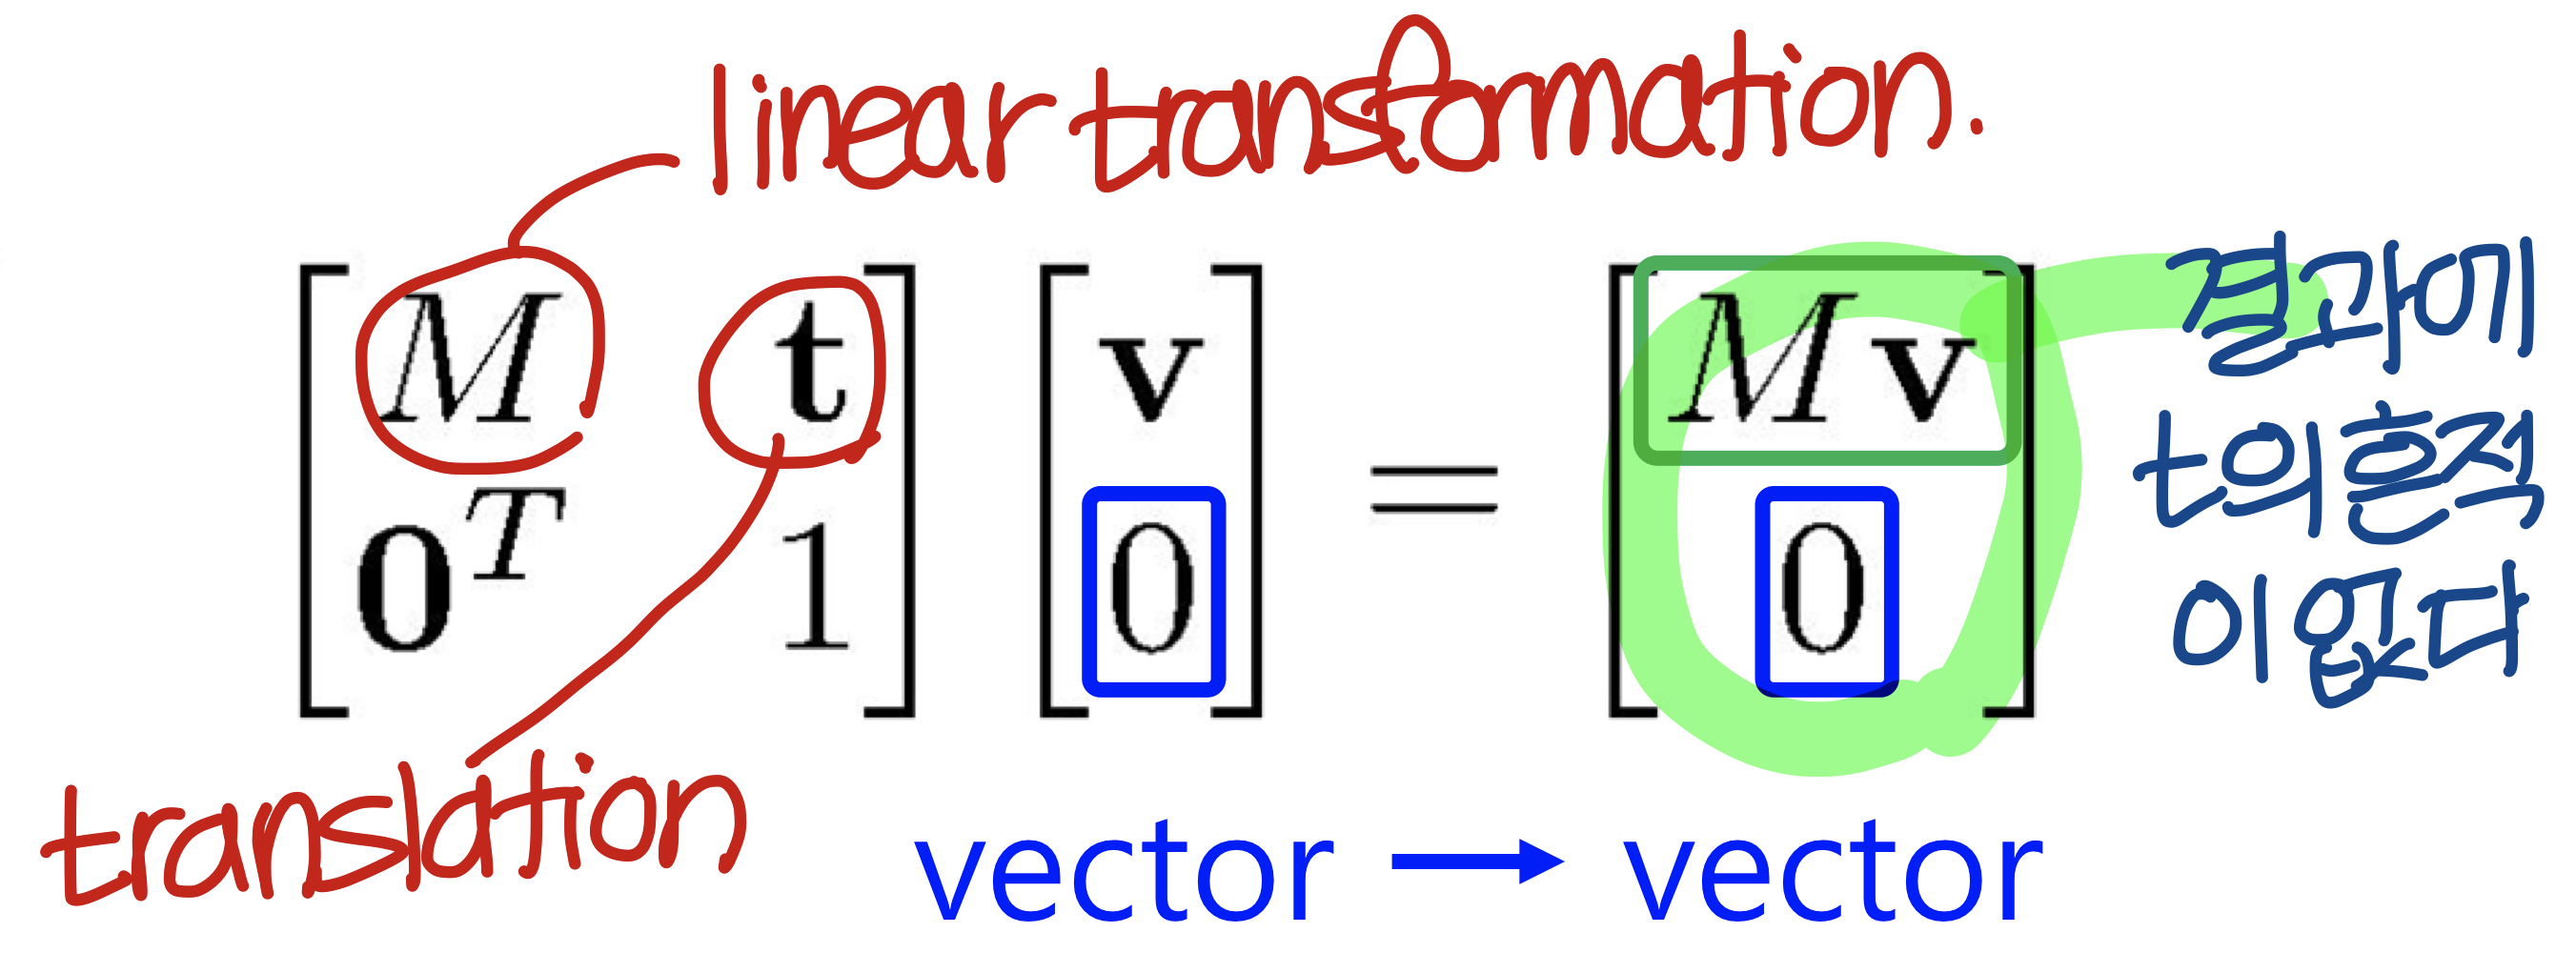
→ affine transformation matrix를 곱하면 벡터는 여전히 벡터. 포인트는 포인트
(회전하고 뒤집고 translation을 한다고 벡터가 포인트 되고 포인트가 벡터되진 않음)
(scale matrix로 x축 0배 y축 0배 z축 0배 하더라도 벡터로 나타남.)
(matrix 곱이 스칼라 곱은 아니니까..?)
Translation is not applied to vector
기억하기!!!! translation matrix를 vecotr에 곱하더라도 vecotr에는 아무 변화가 없다.
Quiz #3

Uploaded by N2T